I'm out of here! I'm headed back on the road again, this time up to southern Utah to see an old friend. I've got my camera in my pocket, ready to snap pictures if a texture or color combination catches my eye. My route takes me back through Cameron, so I'll probably stop at the trading post to ogle the rug loom again. And I'll be camping up in the pine trees. Hmmm...maybe I should gather some pine needles. I was reading yesterday about how to accent gourds with pine needle basketry...
Lets see what kind of inspiration is to be found!
Friday, July 31, 2009
Thursday, July 30, 2009
Looking for Photography Ideas
Well, that took a while. I spent a good portion of the evening processing photos, and writing up listings for the White Scarves so I could put them in the Etsy shop. I have decided that I really need to make myself a light box, for taking pictures. Trying to get good shots using whatever light is in the studio is really hit or miss sometimes. I'm using my little digital camera, and running the shots through Photoshop Elements to crop them and resize them for the internet. I can tweak them a bit in Elements, but you really need to start with good pictures to get good results.
So, you experienced photographers out there...what are some good tips for how to get snappy photographs? That doesn't involve spending lots of money on a camera just now?
On a different note, I met my initial goal of having 25 items in my shop. That puts me onto a second page of merchandise. Go me!
So, you experienced photographers out there...what are some good tips for how to get snappy photographs? That doesn't involve spending lots of money on a camera just now?
On a different note, I met my initial goal of having 25 items in my shop. That puts me onto a second page of merchandise. Go me!
Wednesday, July 29, 2009
Finishing up one project, starting another
I didn't get a heck of a lot done today, because I spent the night last night with my boyfriend in the ER. It is my considered opinion that I never ever ever want to have a kidney stone. If I'm going to have that kind of pain, it is going to be in measurable waves, I'm getting 9 months to psych myself up for it, and I'm getting a baby out of the deal. Luckily, this too shall pass.
 I did have time to wash and hem the White Scarves. I'll get individual pictures taken tomorrow so I can get them up in the shop, but here is a shot of them draped over my weaving bench.
 And here is one more, closer up this time. I have them rolled up, and a light behind them so you can see the patterns. It is great fun to be able to get this many different patterns from one threading. I like using them as a sampler. Some of these would be absolutely gorgeous as yardage to make a doublet with, don't you think?
 I spent some time folding up the floor loom, and setting the triloom back up. I also balled up the yarn I bought for the next shawl. It is hard to get a good color representation under artificial lights, but this should give you the idea. The shawl should have a lovely harvest feel to it. I can picture it in my mind...now I just have to get it out of my brain and into my hands. Here we go!
Monday, July 27, 2009
Brain Storming
Well, the White Scarves are finally off the loom, and in the washing machine. Tomorrow I'll cut them apart and do the hemming, so they should be up in the Etsy shop by Wednesday. It feels so good to finish a larger project!
Now, I'm figuring out what to tackle next. I have several ideas:
-Another triloom shawl. I picked up some more of the Lion brand Homespun yarn, this time in autumn colors. This is my current front runner.
-Time to dig into my supply of gourds. I know it is hot now, but I'd like to have a batch made up and in the shop by the time that things start to cool off.
-I need a couple of more items for the steamer, but I want to experiment with silk scarf painting again. I love playing in the colors, and they work up fairly quickly.
-I've got the one felt cell phone holder that I'm going to put in the shop. It would be good to add to that. Maybe camera cases, instead. I know I have used mine for a couple of years now, and it wears like iron in the pocket. Hmmm...
-More yarn! I have some white that I could spin up, and then maybe space dye. And I have some silk roving I wanted to try.
-I've got a bead necklace that is about half done. I'm stalled on it though, because the different sized beads were creating different widths in the band. Maybe ditch that, and start a free form peyote necklace with the beads instead? Keep the color progression, but change the texture...
-I could sew up some basic Medieval tunics.
-My husband said the strip of White Scarves reminded him of a liturgical stole. Maybe I should pick up that book on liturgical weaving after all.
-I'd like to try the skip hole card weaving technique again. That worked well when I played with it the first time. Time to try some other color combinations.
.....Any other ideas?
Sunday, July 26, 2009
How to Make Felt Beads
 Grab some wisps of wool. Make sure your wool is not labeled 'superwash', because that has been treated so it won't felt.
 Wrap layers of wool around each other, creating a ball form.
 You can use different colors of wool for variety, but normally only the outside layers will show in the finished bead.
 Once you have your fluffy ball of wool, head to your sink. Grab a little bit of soap, so the wool won't stick to your hands.
 Gently soak the wool with hot water.
 Cup your hands, and gently toss the ball of wool back and forth until the outside starts to hold together.
 Now you can start rolling the ball around between your cupped hands, as if you were rolling a ball of clay. Gradually add more pressure, shrinking the ball down as you do so. Add more water or soap as needed.
 Once the wool ball shrinks and gets hard, you can really go to town. Cup your hands. Roll the ball between them, pressing hard, until the felt firms up as much as you like. You should not be able to pull it back apart any more.
 Let the ball dry. Poof! Bead!! A needle will still penetrate, so you can string these up into jewelry if you choose.
 Or, you can drop it on the ground and watch your animals have a blast. Mine love felt ball cat toys--especially if I put dried catnip in the center when I am first forming the ball.
Enjoy! Making wet felt beads is just about instant gratification. And if you layer the colors, you can experiment with carving into the ball to expose the different layers.
Wednesday, July 22, 2009
Go see the Fiddlin Trucker!
My blog post isn't here today. (Looks around...nope, nothing here!) Instead, it is over at the lovely Fiddlin Trucker's spot on the web. This engaging and talented lady interviewed me (via email) the other day, and she posted the results up today. Drop on over and take a peek! And then scroll on back, and take a look at her writings as well. She makes charming baby items--and her model is absolutely adorable!
You can find her at http://thefiddlintrucker.blogspot.com/ .
You can find her at http://thefiddlintrucker.blogspot.com/ .
Tuesday, July 21, 2009
"Snuggler's Blues", and the White Scarf again
I was going to take pictures of the triloom shawl yesterday, but we finally got some rain here in Phoenix. And while I love standing out in the warm wind watching the storm come in, it wasn't really conducive to good pictures. However, today we were back to clear and sunny, so I snagged my daughter and went into the back yard.


The trick, mind you, was getting my weaving back from her once the pictures were taken. The shawl turned out super cuddly and soft--the kind of thing you just want to dive in to and never come out again. In fact, I call this one "Snuggler's Blues." The weave is light and airy, the fringe is thick and luxurious, and the whole thing just drapes beautifully. I made this one for the Etsy shop, but I think I'll be making at least two for home use. One for me, and one for her. And then maybe another one for me.
Anyway, I also finished up the weaving on the second White Scarf last night, and started the third. I'm really enjoying this current pattern. It is nice and clean looking, and those wavy ridges stand out well in the sunlight.

The family is headed out for our weekly trip to the library after dinner, but I'm hoping to get a couple more hours of weaving in later on, after the house settles in for the evening. I'd like to get this scarf done tonight, so I can start a new pattern tomorrow again. My goal is to get these off the loom and finished by the beginning of next week. And somehow, the late night weaving hours are my most productive. During the day, I can go about 15 minutes at a stretch before someone needs attention. Around midnight though, I can put on my music, open the window, light a candle, and just give myself over to the rhythm of the loom. Ahhhh...
Monday, July 20, 2009
Quote for the Day
“A weaver who has to direct and to interweave a great many little threads has no time to philosophize about it, rather, he is so absorbed in his work that he doesn't think, he acts: and it's nothing he can explain, he just feels how things should go.”
Vincent van Gogh
Yup. When things are going well, and you get into the rhythm, a weaver can definitely disappear into the Zone.
One snapped warp thread though, and it is all over!
Vincent van Gogh
Yup. When things are going well, and you get into the rhythm, a weaver can definitely disappear into the Zone.
One snapped warp thread though, and it is all over!
Evening Meditations
Sitting at the loom
deep in the night.
Hands throw...
and...
catch the shuttle.
Feet dance their rhythm
on the treadles.
Eyes follow darting
yarn and slowly
growing fabric...
And the brain is aware
of every detail, and yet
lost
in the threads
of creation.
I am peaceful,
serene,
weaving my midnight
meditation.
-Melissa McCollum 7/19/09
Sunday, July 19, 2009
Busy day in the studio
Outside of time happily spent with my family at meals and such, I've been here in the studio almost all day. Which, come to think of it, doesn't mean I haven't seen a lot of my loved ones. I timed it--I had an average of about 15 minutes at a stretch without one of the four popping in for some reason. I am loved. But it also makes it hard to really bury myself in my work. Ah well, school starts in two weeks. I'll enjoy the kids while I have time with them.
That isn't to say that I didn't get a lot done today, mind you. I spent about an hour at the floor loom, before my tennis elbow spoke up. That gave me time to sample, and start the next White Scarf. I like this pattern--it shows up very clearly, and is just challenging enough to treadle that it keeps me on my toes. I didn't have as much trouble with broken warp threads either. (Knock on wood!) I can get into a nice rhythm with this one.
When my elbow spoke up, I switched back over to the tri-loom. That uses a different set of muscles, so I was able to go to town. I spent most of the day working on the shawl. The weaving portion is done, and I have half the fringe completed. I expect the rest of the fringe will take about 2 hours tomorrow, and then I can do the finishing work along the top and take it off the loom. I am really eager to see what happens to the weave when it isn't under tension any more.
I suspect I'll have to hand wash this one to wet finish it. This is Lion brand Homespun, which is actually acrylic. They say that the yarn is machine washable, but the fringe is long enough that just throwing it in the washing machine would probably lead to a tangled mess. Ah well, I'll worry about that one tomorrow afternoon, after I get it off the loom.
With the amount of time in on this project, and the cost of the materials, initial estimate of selling price would be around $150. It would probably take less time with a different yarn, because I'm having to knot the end of every fringe so the yarn doesn't fray to bits. But, this yarn is sooooo snuggly that the extra time is worth it. I'm looking forward to wrapping up in this one, just to sink into the softness of the fiber. It is incredibly cuddly stuff.
That isn't to say that I didn't get a lot done today, mind you.
 I spent about an hour at the floor loom, before my tennis elbow spoke up. That gave me time to sample, and start the next White Scarf. I like this pattern--it shows up very clearly, and is just challenging enough to treadle that it keeps me on my toes. I didn't have as much trouble with broken warp threads either. (Knock on wood!) I can get into a nice rhythm with this one.
When my elbow spoke up, I switched back over to the tri-loom.
 That uses a different set of muscles, so I was able to go to town. I spent most of the day working on the shawl. The weaving portion is done, and I have half the fringe completed. I expect the rest of the fringe will take about 2 hours tomorrow, and then I can do the finishing work along the top and take it off the loom. I am really eager to see what happens to the weave when it isn't under tension any more.
 I suspect I'll have to hand wash this one to wet finish it. This is Lion brand Homespun, which is actually acrylic. They say that the yarn is machine washable, but the fringe is long enough that just throwing it in the washing machine would probably lead to a tangled mess. Ah well, I'll worry about that one tomorrow afternoon, after I get it off the loom.
With the amount of time in on this project, and the cost of the materials, initial estimate of selling price would be around $150. It would probably take less time with a different yarn, because I'm having to knot the end of every fringe so the yarn doesn't fray to bits. But, this yarn is sooooo snuggly that the extra time is worth it. I'm looking forward to wrapping up in this one, just to sink into the softness of the fiber. It is incredibly cuddly stuff.
Saturday, July 18, 2009
First Go at the Tri-Loom
I managed to get some good studio time today, for the first time this week. Travel was a great experience, but I really enjoy the quiet rhythm of my studio. It was pleasant to get back to it.
The first of the five white scarves has finished the weaving process. I'm still recovering from tennis elbow, so I can only work at the floor loom for a couple of hours before I have to give it a rest. But progress is being made. I'm trying to decide which design I'll do for the next one. The scarves serve as samplers, so I can see the different pattern variations I can get from one threading.
Once I finished the floor loom weaving for the day, I broke down and set up my new tri-loom. It is much more low tech than my floor loom, but very satisfying to weave on. I'll have to hunt to see if I can figure out the history of this type of loom. I really have no idea where it came from. But these are certainly popular among fiber geeks these days.
They are easy to make. Triangle looms consist of three pieces of wood fastened together, with nails or pegs all along the sides. There are good how-to directions to be found on the web, if you want to go that route. I kept meaning to make myself a loom...but in several years hadn't gotten around to the project. So I finally threw money at the issue. The loom arrived while I was away on my trip, so I am only now getting around to trying it out. Mine is nicely constructed and sanded, with wood pegs to weave on. I assembled it today, and clamped it onto my painting easel. That seems to hold it well.
Weaving on the tri-loom is pretty slick. It is a 'continuous loop' process. Here:
I'm weaving a simple over/under tabby pattern. So, I run my hand or hook over/under the threads already on the loom, and grab the yarn at the top.
 Pull that yarn down in a loop, and place it around the next side peg.
 Grab the bottom of the loop that you just put on the peg, and walk it over to the other side of the loom. One side stays anchored on the left.
 The other side of the loop gets put on a peg on the right hand side of the loom.
 Now, see? The leg of the loop going back up is already woven for you. Just hook your yarn around the top peg, and straighten up your rows. You've made a giant 'U' shape. Now you're ready to repeat the process going the other way.
 So, you're warping and weaving the loom all in one action. The weaving starts at the top and works down, as well as working in from the side points.
 As you continue weaving, your work progresses down toward the bottom point, and in toward the center. If you change colors along the way, the colors are repeated symmetrically, making a really nice plaid pattern.
I'm really eager to see how this turns out. The weave is looser than what I'm used to, but I think that should make a nice airy shawl. And I suspect it will tighten up some when I take it off the loom.
Great fun! I should have tried this a year or so ago.
The first of the five white scarves has finished the weaving process. I'm still recovering from tennis elbow, so I can only work at the floor loom for a couple of hours before I have to give it a rest. But progress is being made. I'm trying to decide which design I'll do for the next one. The scarves serve as samplers, so I can see the different pattern variations I can get from one threading.
Once I finished the floor loom weaving for the day, I broke down and set up my new tri-loom. It is much more low tech than my floor loom, but very satisfying to weave on. I'll have to hunt to see if I can figure out the history of this type of loom. I really have no idea where it came from. But these are certainly popular among fiber geeks these days.
They are easy to make. Triangle looms consist of three pieces of wood fastened together, with nails or pegs all along the sides. There are good how-to directions to be found on the web, if you want to go that route. I kept meaning to make myself a loom...but in several years hadn't gotten around to the project. So I finally threw money at the issue. The loom arrived while I was away on my trip, so I am only now getting around to trying it out. Mine is nicely constructed and sanded, with wood pegs to weave on. I assembled it today, and clamped it onto my painting easel. That seems to hold it well.
Weaving on the tri-loom is pretty slick. It is a 'continuous loop' process. Here:

I'm weaving a simple over/under tabby pattern. So, I run my hand or hook over/under the threads already on the loom, and grab the yarn at the top.
 Pull that yarn down in a loop, and place it around the next side peg.
 Grab the bottom of the loop that you just put on the peg, and walk it over to the other side of the loom. One side stays anchored on the left.
 The other side of the loop gets put on a peg on the right hand side of the loom.
 Now, see? The leg of the loop going back up is already woven for you. Just hook your yarn around the top peg, and straighten up your rows. You've made a giant 'U' shape. Now you're ready to repeat the process going the other way.
 So, you're warping and weaving the loom all in one action. The weaving starts at the top and works down, as well as working in from the side points.
 As you continue weaving, your work progresses down toward the bottom point, and in toward the center. If you change colors along the way, the colors are repeated symmetrically, making a really nice plaid pattern.
I'm really eager to see how this turns out. The weave is looser than what I'm used to, but I think that should make a nice airy shawl. And I suspect it will tighten up some when I take it off the loom.
Great fun! I should have tried this a year or so ago.
Wednesday, July 15, 2009
Turn of the Century Navajo Weaving

I'm still out on the road. This time, I'm writing from a hotel room in Gallup, NM. This morning though, we were in Durango, CO, looking at Fort Lewis college for my daughter. Durango is nestled in the Rocky Mountains,
 in a beautiful territory full of mountain peaks, pine trees, wild flowers, and tumbling streams. The college itself is on a hill above town, giving the students an incredible view. My daughter has pretty much decided that she can get comparable programs closer to home, so she probably won't be applying to the college. But the territory is stunning. We may come back some time for a vacation. I could see spending a week tucked back in the woods, happily treadling my spinning wheel to the music of bird calls and burbling water.
The college does have a Center for SouthWest Studies though, and we got to peek inside one of their display rooms while we were on school tour.
 After seeing the rug weaver yesterday, it was fascinating to see a handful of weavings from around 100 years ago. Some of the pieces on display were the rugs that I am used to seeing. Some represented other weaving techniques. That plain looking brick red panel in the back is actually intricately patterned with twill weaves, in blocks.
What fascinated me as a weaver though, was that fuzzy orange mat in the front of the display. I had never thought of the Navajo weaving shag rugs!

In the moments I had, I took a closer look at that one, and an even more spectacular example that was hung on the wall nearby. They were made around 1890. The warp is cotton. The weft is native wool and Angora goat fleece. The fleece is pulled through the weave so it only sticks out on one side. The pattern was striking, and it looked really plush and comfortable.
So, what did the Navajo use shag rugs for? These were weaver's mats! If you've seen older depictions of native weavers at their rug looms, they are usually shown sitting on the ground to weave. Now I know what they were actually sitting on. That looks a heck of a lot more comfortable than bare dirt, especially for extended weaving sessions!
Hmmmm. Maybe I need to weave some shag, to pad the weaving bench for my floor loom. I've got some mohair tucked away...
Tuesday, July 14, 2009
Road trip through the Navajo nation
I'm out and about right now, on the road touring colleges. My daughter is going to be a senior in high school this year, so now is the time for information gathering. We looked at Northern Arizona University, in Flagstaff, AZ this morning. Right now, I'm sitting in a hotel room in Durango, CO, so we can look at Fort Lewis college tomorrow morning.
It was a fascinating trip from Flagstaff to Durango today. Most of the day, we were driving through Navajo territory. Man, is that some desolate but incredibly beautiful landscape! If you like geology, this is your place--because there isn't much in the way of greenery to get in the way of the spectacular rock formations. Just the occasional manufactured home, with a couple of pick up trucks in front and a hogan out back. And, now and again a handful of cattle or a herd of sheep.
The sheep, of course, are what interested me. I saw at least 3 or 4 different breeds along the roadside. Sometimes literally along the roadside! I think those were going to have to be rounded back up. But sheep leads to wool, which leads to yarn, which leads to the absolutely spectacular rugs that the Navajos weave.
An hour north of Flagstaff is the little town of Cameron. We stop there just about any time we're headed north, because there is a trading post there that is great fun. (Well, that and the fact that there is a bathroom. Priorities!) In 1911, a suspension bridge was built there over the Little Colorado River. Soon after, the Richardson brothers started a trading post, where the local Navajo and Hopis could barter their wares for goods from afar. The trading post has been in operation since. In fact, the president of the post these days is a direct descendant of the original founders. And, oh my! The artwork that is available is very very tempting.
I usually admire the pottery on the way in, ooh and ahh over the baskets, then go take care of business. Then a stop by the book area. And then, I head back to the rug area. They often have a loom set up, and I love to look at it. The more I learn about weaving, the more I can understand what I am seeing.
Today though. Today was a wonderful stroke of luck. The artist was at her loom, actively weaving at her current rug. She graciously allowed me to take her picture, but was focused on her work. She warmed up a bit when I told her I admired the skill of her hands, and how very straight her selvages (edges of the weaving) were. We chatted for a bit, before I had to move on. She's been weaving for over 40 years now. She said it took her about a decade to really perfect the edges of her rugs. (I don't feel so bad now about my attempts at tapestry!) Most all of her work these days are commission pieces, usually to repeat customers. I was amazed watching her work. She made it look so easy...but I know it is most definitely not! Her movements were sure and precise, her rows even, and she worked the design without a pattern to refer to. Now, there is an incredible artist.

Wow. Just...wow.
It was a fascinating trip from Flagstaff to Durango today.
 Most of the day, we were driving through Navajo territory. Man, is that some desolate but incredibly beautiful landscape! If you like geology, this is your place--because there isn't much in the way of greenery to get in the way of the spectacular rock formations. Just the occasional manufactured home, with a couple of pick up trucks in front and a hogan out back. And, now and again a handful of cattle or a herd of sheep.
The sheep, of course, are what interested me. I saw at least 3 or 4 different breeds along the roadside. Sometimes literally along the roadside! I think those were going to have to be rounded back up. But sheep leads to wool, which leads to yarn, which leads to the absolutely spectacular rugs that the Navajos weave.
An hour north of Flagstaff is the little town of Cameron.
 We stop there just about any time we're headed north, because there is a trading post there that is great fun. (Well, that and the fact that there is a bathroom. Priorities!) In 1911, a suspension bridge was built there over the Little Colorado River. Soon after, the Richardson brothers started a trading post, where the local Navajo and Hopis could barter their wares for goods from afar. The trading post has been in operation since. In fact, the president of the post these days is a direct descendant of the original founders. And, oh my! The artwork that is available is very very tempting.
I usually admire the pottery on the way in, ooh and ahh over the baskets, then go take care of business. Then a stop by the book area. And then, I head back to the rug area. They often have a loom set up, and I love to look at it. The more I learn about weaving, the more I can understand what I am seeing.
Today though. Today was a wonderful stroke of luck. The artist was at her loom, actively weaving at her current rug.
 She graciously allowed me to take her picture, but was focused on her work. She warmed up a bit when I told her I admired the skill of her hands, and how very straight her selvages (edges of the weaving) were. We chatted for a bit, before I had to move on. She's been weaving for over 40 years now. She said it took her about a decade to really perfect the edges of her rugs. (I don't feel so bad now about my attempts at tapestry!) Most all of her work these days are commission pieces, usually to repeat customers. I was amazed watching her work. She made it look so easy...but I know it is most definitely not! Her movements were sure and precise, her rows even, and she worked the design without a pattern to refer to. Now, there is an incredible artist.
Wow. Just...wow.
Sunday, July 12, 2009
Work in Progress: White Scarves
I know it is a supposed to be a day of rest, but I'm spending the afternoon in my studio anyway. (Aw darn. I have to play with my loom!) This coming week my husband, my daughter and I are going on a road trip. Michelle is headed into her senior year of high school, so we're taking a chance this summer to scout out possible colleges for her. (Anyone know of a good theater tech and design program within a 6 hour drive of Phoenix, AZ?)
Anyway, I'm going to miss out on much of my work time this week. I really want to get my current project on the floor loom done in a reasonable amount of time, so I can play with the triangle loom when it gets here. So I started the weaving process on the first of five white scarves. (The White Scarf, if you recall, is an award in the SCA for excellence in rapier fighting. The recipient is allowed to wear a small white scarf pinned to his or her shoulder.) I'm using a twill pattern that undulates a bit, giving more of a flowing feeling to the resulting pattern. Each of the five scarves will have a slightly different pattern.
Here is the first one, front and back:


I'm having a bit of a trouble with broken warp threads on the edges of the weaving. That means the threads are drawing in a bit in the weaving process, which is natural. It also means that they get abraded a bit as they go through the metal reed that spreads the threads out. Last time I made White Scarves, the 8/2 cotton I used was strong enough to stand up to this abuse. Not all weaving yarn is made the same though, even if it is the same color, fiber content, and size. I think, if a particular thread breaks more than once, I'm going to replace it with a similar but slightly sturdier yarn. It shouldn't be noticeable in the finished product, but it will save me headaches. Good thing I know how to repair broken warp threads!
Grey Gotland yarn
Do I have any Viking historical reinactors in the house yet?
My most recent hand spun yarn was made from a pound of Gotland wool. I poked around, and found that the Gotland sheep were bred from the primitive Gute sheep. The Gute sheep were the descendants of the sheep that the Vikings brought with them to the Island of Gotland. How cool is that?! (http://www.gotlandsheep.com/) This is probably as close to an authentic period wool as I've had pass through my hands so far. It has a slight luster to it, and looks ash grey, maybe with a beige undertone depending on the light. (That isn't the full pound in the picture, of course. I snapped that shot when I was almost done spinning.)
Have you seen the "Lord of the Rings" movies? Do you remember those magical Elven cloaks that the characters hid under? Yup. Made of Gotland wool. The Gotland sheep are commonly found these days in Sweden, Norway...and New Zealand. Those cloaks were woven in an undulating twill, from sheep that were descendants of those imported from Sweden to New Zealand about 20 years ago.
Anyway, Tolkien aside,
I really spun this batch up with the Viking reinactor in mind. It is 985 yards of 14 wpi sport weight 2 ply yarn. Though it should knit or crochet or weave up beautifully, I was thinking that it would be a great beginning to a entry into an Arts and Sciences competition for sprang (http://www.regia.org/sprang.htm), or naalbinding (http://www.stringpage.com/naal/naal.html). Those are two fiber arts that I haven't tried my hands at...yet. I have too much on my plate at the moment to learn them, so I'm putting this yarn up in the Etsy shop. But if it doesn't sell by the time that I have learning time, well, this will be MINE. Talk about points for starting with authentic materials! And there is more than enough here to make a decent sized project.
So many projects. So little time. But I want to do it all!!
My most recent hand spun yarn was made from a pound of Gotland
 wool. I poked around, and found that the Gotland sheep were bred from the primitive Gute sheep. The Gute sheep were the descendants of the sheep that the Vikings brought with them to the Island of Gotland. How cool is that?! (http://www.gotlandsheep.com/) This is probably as close to an authentic period wool as I've had pass through my hands so far. It has a slight luster to it, and looks ash grey, maybe with a beige undertone depending on the light. (That isn't the full pound in the picture, of course. I snapped that shot when I was almost done spinning.)
Have you seen the "Lord of the Rings" movies?
 Do you remember those magical Elven cloaks that the characters hid under? Yup. Made of Gotland wool. The Gotland sheep are commonly found these days in Sweden, Norway...and New Zealand. Those cloaks were woven in an undulating twill, from sheep that were descendants of those imported from Sweden to New Zealand about 20 years ago.
 Anyway, Tolkien aside,

I really spun this batch up with the Viking reinactor in mind. It is 985 yards of 14 wpi sport weight 2 ply yarn. Though it should knit or crochet or weave up beautifully, I was thinking that it would be a great beginning to a entry into an Arts and Sciences competition for sprang (http://www.regia.org/sprang.htm), or naalbinding (http://www.stringpage.com/naal/naal.html). Those are two fiber arts that I haven't tried my hands at...yet. I have too much on my plate at the moment to learn them, so I'm putting this yarn up in the Etsy shop. But if it doesn't sell by the time that I have learning time, well, this will be MINE. Talk about points for starting with authentic materials! And there is more than enough here to make a decent sized project.
So many projects. So little time. But I want to do it all!!
Saturday, July 11, 2009
Waiting for my Triloom
Yes, I know I could make it myself. I know I should make it myself. But honestly, in about two years of looking at the project, I didn't do it. So I finally threw money at the issue.
Oh...what am I talking about? I bought a triloom off of Ebay. Item number 140332009110, if you want to go take a look. A triloom is a frame style loom, where you weave in a continuous loop. I know--that doesn't make much sense now. I'll post some pictures when I get it up and running. Anyway, it is shaped like a triangle, so you can get some great shawls off of it. Mine will be 6 1/2' long across the top. I got to try a smaller one out at the Griffin Dye Retreat that I went to early this summer, and had a great time with it. You warp and weave in one single process, which is really slick. I've been in contact with the gentleman who made mine, Gerard Schubert. He has been most pleasant to deal with, and let me know that it is on the way. I am sooooo looking forward to this!
In the meantime, I need to get myself a long afghan or tunisian crochet hook to use with it. I'd love to find a hand made wooden one, just because I'm a bit finicky when it comes to the tools I use. I love the feel of well sanded and finished wood. It just feels alive to the touch. If anyone knows of a good source, let me know. Otherwise, I'll browse Etsy until I find a good one. I tried looking at Michaels craft store today, to see if they had something that would work until I found the one I wanted. They didn't carry anything like that at all. Time to make a trip across the valley to the Fiber Factory. Ah, darn! I need to go browse my local weaving/spinning supply store. Whatever shall I do. Oh help, oh help. (And please don't throw me in the briar patch!)
While I was at Michaels though, I did pick up a few skeins of yarn for my first shawl. This is Lion Brand Homespun, in nummy colors. What do you think?

Yes, I know it is blue again. That tends to be what I reach for first. I swear, the second shawl will be a different color!
Thursday, July 9, 2009
Warping Front to Back
I warped up the floor loom today. I'm making a set of five White Scarves. The White Scarf is an award in the SCA, for excellence in rapier fighting. The recipients are allowed to wear a small white scarf pinned to their shoulder. (One of these is already spoken for, but the rest will be for sale, for $45 each. If you want to pre-order before these get off the loom, I can let you have one for $40.)
Anyway, I thought I'd take this opportunity to document the warping process. If you ask 10 weavers the best way to warp a loom, you'll get about 15 different answers. As long as the threads end up where they are supposed to be and under even tension, it doesn't really matter which method you choose. I warped this from the front of the loom to the back. Here:
 First, I measured out my warp. I have a horizontal warping mill to make this process easier. I measured out a guide string 6 yards long and put it on there first. Then I put on 82 threads of unbleached 8/2 cotton. Down at the far end there, you can just see that I made a figure 8 around the pegs there. This gives me the 'cross', which helps keep the threads in order. More on this later.
 I chained the warp to take it off the warping mill. This is a process of pulling loops through loops, kind of like crochet. This keeps the threads from tangling up as I move them around the room. Tangles are bad!! (I chain up my tent ropes this way when I'm tearing down from camping, too. Keeps them from looking like a plate of spaghetti in the bag. But that is neither here nor there. Back to weaving...)
 Then I took that warp chain and wrapped it a couple of times around the front beam of the loom, with the cross end facing into the loom. That gives me something to pull against during the threading process.
 Here I've stuck my fingers through the cross. See how I can pick up the threads in the same order that I wound them on the mill? It is a good trick to avoid tangles. Like I said: tangles BAD.
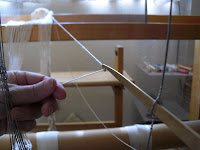
 Ok, it is time to put the threads through the reed. The reed is at the front of the loom. It spreads the threads to the proper width. It also moves back and forth when you weave, to beat the threads firmly into place. I'm using a doohickey called a sley hook to pull the threads through. (You'll sound more official if you say sley hook, rather than doohickey. Just saying.)
 Here's the warp all sleyed through the reed.
 Now, move around to the back of the loom. Grab some pillows and have a seat. It is time to thread the yarn from the reed back through the heddles. Each thread gets its own heddle. This controls when each thread gets lifted up for weaving. I'm using the other end of my sley hook to grab the threads through the heddles.
 Here's the heddles all threaded.
 Continuing on to the back of the loom, the warp gets tied onto the apron rod, which is attached to the back beam.
 Here is the warp, being cranked around the back beam. I put an old piece of window blind in every half turn or so. This prevents the threads from slipping down through the built up layers. It would mess up the eveness of the tension if they did.
 Every turn of the back beam or so, I trot back around to the front of the loom and give a gentle tug to the warp. This gets rid of any tangles, and evens up the tension. Say it with me once more: tangles are Not Our Friend!
 Once the warp is all wound around the back beam, it is time to tie onto the front apron rod. I separate the warp into about inch batches, and tie the first half of the knot.
 Once each first half is tied, I pull up on the knots to tighten up the warp. The goal is to have every thread under the same tension.
 While I'm trying to make the tension even, every so often I trot back to the back of the loom, and run my hand across the warp feeling for loose spots. (And then I do it again, just to marvel at the creation of precise order. And to fondle the fiber. But that is just me.)
 Once everything is even up, I tie the second half of the knot.
 I've previously attached the shafts that hold the heddles to the floor treadles. Now I step down on the treadles. Some of the threads are raised, and some stay in place. This forms the shed where the shuttle will pass through. I look into the shed, to make sure no threads are twisted around each other. Perfect!
 Now, I use some bulky yarn that I have around, and weave about an inch. This spreads the warp out evenly, getting it ready for the real stuff.
 There! The loom is ready to go. And now, I finally get to start what people think of as 'really weaving'. If you don't get the prep work done well though, you might as well give up on the project. A good weaving succeeds or fails in the warping process.
Anyway, I thought I'd take this opportunity to document the warping process. If you ask 10 weavers the best way to warp a loom, you'll get about 15 different answers. As long as the threads end up where they are supposed to be and under even tension, it doesn't really matter which method you choose. I warped this from the front of the loom to the back. Here:
 First, I measured out my warp. I have a horizontal warping mill to make this process easier. I measured out a guide string 6 yards long and put it on there first. Then I put on 82 threads of unbleached 8/2 cotton. Down at the far end there, you can just see that I made a figure 8 around the pegs there. This gives me the 'cross', which helps keep the threads in order. More on this later.
 I chained the warp to take it off the warping mill. This is a process of pulling loops through loops, kind of like crochet. This keeps the threads from tangling up as I move them around the room. Tangles are bad!! (I chain up my tent ropes this way when I'm tearing down from camping, too. Keeps them from looking like a plate of spaghetti in the bag. But that is neither here nor there. Back to weaving...)
 Then I took that warp chain and wrapped it a couple of times around the front beam of the loom, with the cross end facing into the loom. That gives me something to pull against during the threading process.
 Here I've stuck my fingers through the cross. See how I can pick up the threads in the same order that I wound them on the mill? It is a good trick to avoid tangles. Like I said: tangles BAD.
 Ok, it is time to put the threads through the reed. The reed is at the front of the loom. It spreads the threads to the proper width. It also moves back and forth when you weave, to beat the threads firmly into place. I'm using a doohickey called a sley hook to pull the threads through. (You'll sound more official if you say sley hook, rather than doohickey. Just saying.)
 Here's the warp all sleyed through the reed.
 Now, move around to the back of the loom. Grab some pillows and have a seat. It is time to thread the yarn from the reed back through the heddles. Each thread gets its own heddle. This controls when each thread gets lifted up for weaving. I'm using the other end of my sley hook to grab the threads through the heddles.
 Here's the heddles all threaded.
 Continuing on to the back of the loom, the warp gets tied onto the apron rod, which is attached to the back beam.
 Here is the warp, being cranked around the back beam. I put an old piece of window blind in every half turn or so. This prevents the threads from slipping down through the built up layers. It would mess up the eveness of the tension if they did.
 Every turn of the back beam or so, I trot back around to the front of the loom and give a gentle tug to the warp. This gets rid of any tangles, and evens up the tension. Say it with me once more: tangles are Not Our Friend!
 Once the warp is all wound around the back beam, it is time to tie onto the front apron rod. I separate the warp into about inch batches, and tie the first half of the knot.
 Once each first half is tied, I pull up on the knots to tighten up the warp. The goal is to have every thread under the same tension.
 While I'm trying to make the tension even, every so often I trot back to the back of the loom, and run my hand across the warp feeling for loose spots. (And then I do it again, just to marvel at the creation of precise order. And to fondle the fiber. But that is just me.)
 Once everything is even up, I tie the second half of the knot.
 I've previously attached the shafts that hold the heddles to the floor treadles. Now I step down on the treadles. Some of the threads are raised, and some stay in place. This forms the shed where the shuttle will pass through. I look into the shed, to make sure no threads are twisted around each other. Perfect!
 Now, I use some bulky yarn that I have around, and weave about an inch. This spreads the warp out evenly, getting it ready for the real stuff.
 There! The loom is ready to go. And now, I finally get to start what people think of as 'really weaving'. If you don't get the prep work done well though, you might as well give up on the project. A good weaving succeeds or fails in the warping process.
Subscribe to:
Posts (Atom)