I am involved in a historical recreation group, and as such I ended up looking at making a cotehardie. Cotehardies were the height of fashion in the 1300's, and are usually what people think of as a Medieval princess' dress. To make a nice big flowing skirt, you add triangles of fabric called 'gores'. Now, one of the things I have been told is that making the gores a contrasting color to the rest of the dress just wasn't historically accurate. "Wrong, wrong, wrong!" is what I've read.
But...it is pretty! And I like it. And I'm stubborn, so I kept looking for documentation that perhaps sometime folks did this contrasting gores thing.
This evening I was wandering through the book, "Fashion in the Age of the Black Prince" by Newton, and stumbled across the following pictures:
And that last one reminded me of a line drawing from the book "Dress Accessories", from the Museum of London.
I'm thinking I'll make my cotehardie with contrasting gores, and feel pretty safe in the knowledge that it is perhaps plausible after all.
Edit: Also Figure 70 on this page: http://publishing.cdlib.org/ucpressebooks/view?docId=ft8k4008jd&chunk.id=d0e3511&toc.id=d0e3511&brand=ucpress
Edit again: I tracked down the picture that the last line drawing was based on, and this is why you don't trust line drawings. Take a look: http://vieuxchamps.com/persona/enlarged/wg/wpic3.php . The figure on the right does not have contrasting gores after all. The artist who did the line drawing was, I think, not looking closely. This image does, however, show the variety of patterned fabrics that could be used.
Welcome to the crafty side of my life. Here I'll be musing about projects I'm working on, and the creative process around them. Oh, and there will be occasional bouts of cooking, photography, and poetry, too.
Friday, March 23, 2012
Friday, March 9, 2012
Viking Wire Weaving: Changing size and flexibility through the draw plate
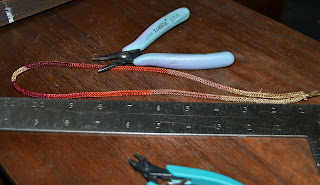
I just finished up weaving a Viking wire woven necklace. (For instructions, take a look at this post: http://tangibledaydreams.blogspot.com/2010/03/tutorial-viking-wire-weaving.html ) I'm using 'Artistic Wire' in a couple of different colors this time around. I weave the necklace about half as long as I want the finished product to be, and then draw it through successively smaller holes in a draw plate. This shrinks down the diameter of the weave, increases the length, and turns a rigid tube of wire into a supple chain.
So, this necklace was just around 12" when I was done with the weaving portion.
I pulled it through smaller and smaller holes in the draw plate, all the way down to the smallest.
The final chain ended up being 23" long.
It always amazes me how flexible the chain gets!
I still need to add a hook and eye clasp to this one. And I'm also going to take sandpaper to the chain, to knock the colored coating off of the outside of the chain. That will leave the color on the inside, but expose the copper core of the wire on the outside, making a beautiful multi-tone necklace. (It means I don't have to worry about the color wearing off in spots over time and wear and ruining the look of the necklace, because I will have already knocked down the color in a controlled and thorough manner. It makes the eventual wearing off of color a feature, not a bug.)
Thursday, March 1, 2012
Not a dog rug. Really. (But it should be, right?)
Awhile before Christmas, I made a sheet of flat felt in order to make my sweetie a hat. I got around to starting on that last night, and put my felt, pattern, and scissors down on the ground to prep for cutting out the pieces. I turned around to get my camera (tutorial to come in a few days)...and when I turned back my pup had staked his claim to this absolutely perfectly sized wool felt puppy rug.
I wasn't actually going to cut into his rug...was I Mom? ....Mom?? I wasn't so horribly unkind and unfair to dogs, was I???
Yup. I was. The hat is cut out and sewn, and I need to check it for size before I put the finishing touches on it. My poor abused puppy will have to make do with curling up in my lap instead. (He's currently trying to convince me to quit typing, because it is making his arm pillow move too much.)
Subscribe to:
Posts (Atom)


