Wednesday, October 28, 2009

Life drawing poses for Halloween

Halloween is fast approaching, and to celebrate the teachers of today's life drawing classes and I put our heads together. Up till now, the students have been drawing mostly nude figure studies. I've seen lots and lots of drawings of me where I'm kind of floating mid air in the middle of the page. So we decided to give the students a draped figure to draw, and made a tableau that just tempted them to compose an entire scene. It worked, by the way. The students were a little freaked by the change at the beginning of the classes, but by the end they were having fun and making some fantastic art.

Here's a couple of the poses we came up with:


The skeleton is a replica. But that skull? Real. Let me tell you, it gets a bit creepy to sit for 50 minutes, just contemplating someone else's disembodied head! But also incredibly fascinating. That kind of opportunity just doesn't come along every day for most of us.


For those of you who got the last issue of 42 Magazine (http://www.42magazine.com/) , this is the skull in question in my poem "Skull Session in the Life Drawing Lab".

Another Treasury

I'm flattered over here! Some of my kumihimo braided cording has appeared in an Etsy treasury. The theme on this one is autumn colored items from the SCA Etsy street team. But looking at these treasuries is a dangerous thing for me. Now I'm eying the weaving stool, and the slat bed, and oooh is that necklace pretty, and...

http://www.etsy.com/treasury_list_west.php?room_id=73440

Tuesday, October 27, 2009

First go at the Circular Sock Machine

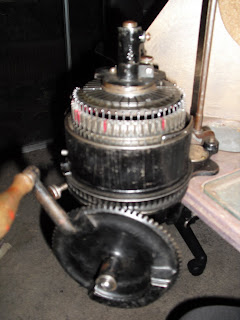
I recently got a Creelman Brothers circular sock machine off of Ebay. It came missing a few parts, so I've spent the last while working on that. I got a replacement yarn carrier, and the new set of needles came in today. I also had an idea of how to fudge around the missing weight buckle. So now that I had all the pieces in hand, today was the day to get started. First thing to do was take the machine apart, clean it with an old toothbrush, oil it, and put it back together. Then I dug into my stash of yarn, took a deep breath, and tried it out.

First off, to knit on the sock machine you need to already have stitches on the needles. Not having any prior knitting to use, this was a challenge. The original machines came with a doohicky that you were supposed to use to attach yarn to for set up, but mine is, well, rather mangled. 100ish years are not necessarily nice on wires. So I decided to try a tip I had read of, and used the plastic mesh that came around the last batch of oranges that we bought at the grocery store. I hung the mesh on the hooks, and then threaded up some yarn and started knitting. It took a bit...but it worked!!


You can see there were some spots that the needles didn't catch the yarn. I learned I needed even tension, and a medium and steady cranking speed to help avoid the dropped stitches.

Once I had gotten the hang of knitting a tube, I taught myself to change colors. That took several tries, but I eventually got it.


After that, I was brave enough to try to make a set up bonnet, so I wouldn't have to use the orange mesh again. I used the excellent directions at http://www.countryrain.com/Bonnet.htm . Learning to move the stitches from one needle to the next took several tries, but I like the effect of regular openings in the fabric.


After this picture, I 'hung the hem', which is explained in detail at the Country Rain web site that I mentioned above. Basically, it takes the bottom of the white yarn there and folds it up to hook it on the needles, so the top of the finished product will be where those holes are. Then I cranked out about 10 inches of tubing. That part went fast!! After I took the piece off the machine, I snipped the blue starter yarn off. Voila! A set up bonnet to use! And it only took three or four tries. I am so tickled!!


And here is a shot of the machine while I was playing with it. You can see the work around I used to deal with the missing weight buckle. I am using a strong clamp, and clipping it to the work. I hang the weights on the knitted material right above it. I'd still like to come up with a buckle, but this is working for now.


Not bad for a first day's learning. There are videos on You Tube that have been very helpful, as well as some written directions around the internet. Next up is learning to use the set up bonnet, more practice making tubes and changing colors, and perfecting the hung hem. Then I get to start learning how to make heels and toes.

Saturday, October 24, 2009

Treasury: Fall Shawls

I was informed this evening that one of my tri-loom shawls was included in a treasury on Etsy. I popped over to take a look...and oh my! There are some tempting items in there. I'm honored to be included in that company. And I'm also sitting on my pocket book. I really don't need that Infinity Wrap, no matter how scrumptious it looks. Really. Don't need it.

Pretty pretty stuff!

http://www.etsy.com/treasury_list.php?room_id=89767

Friday, October 23, 2009

card weaving: skipped thread technique

I'm slowly working on the sock machine. Baby steps. In the meanwhile, I've got a band of card woven trim warped up. I put this band on my inkle loom. It is working much much better than the last band I wove, which I tried on a rigid heddle loom. The tension was alllll messed up on that one! In this case, I clamped the inkle loom down on top of my cone holder, and employed binder clips to keep the stacks of cards in order when I was warping. This gave me an even tension with no warp tangles, which is paying off in a consistent weave.


For this band, I'm using #10 crochet cotton, in maroon and light yellow. There are four cards threaded with 4 strands of maroon for the borders. For the interior pattern, I threaded 24 cards with only two threads of yellow. The other two holes were left blank. This is a skipped card technique, that dates back to Viking age. When you are weaving, the weft thread shows through where the warp threads are missing, giving you a 3d effect in the finished band. I'm using maroon for the weft thread.


It makes for a subtly elegant band. I'm thinking it might look spectacular if I used gold and black silk thread, instead of the cotton. Next time I'm over at Fiber Factory, I'll have to see what they have in the way of silk. Road trip!

Wednesday, October 21, 2009

Sock Machine trouble shooting

Ok, I've ordered a replacement yarn carrier for my antique sock knitting machine, and that should be here soon. In the meantime I got the thing cranking, turning one way when I had the needles in place. Only one way. But all the videos on You Tube I've seen show the thing cranking easily in both directions. In fact, that is necessary to make the heel and toe of the sock. I checked the directions I had, from back in the 1920's. Nope, no mention of something I need to push to make it reverse.

Hmmm...

I took it apart, and took all the needles back out to examine it. Pretty simple machine. No obvious reason it wasn't going in reverse.

I put the cylinder back in place, without the needles. Forward and reverse just fine.

Put one needle in place. Yup, both directions just fine. Put in another needle. No problem. Put in the third needle...and it jams up going in reverse.

Ah ha! Pull that needle out and set it aside. Put in a different needle. Forward and reverse just fine. Gotcha!! The trouble is that some of the needles are out of true.

I went through one needle at a time, and found enough good needles to fill the smaller of the two cylinders. I can now crank around nicely in both directions. There aren't enough good needles left to fill the cylinder with the more grooves though, so I did a web hunt, and tracked down a manufacturer who makes needles that should fit my machine.

Pay Pal to the rescue. They should be on their way before long.

Now, to figure out how to kludge together something to hang the weights from...

Monday, October 19, 2009

Happy poet

I'm a bit bemused this evening. Today my copy of 42 Magazine ( http://42magazine.com/ ) came in the mail. I thumbed through it...and there it was. My own poem and drawing, there in black and white. Now, I've been published several times before. But I think this is the first time I have gotten paid for my poetry in something other than contributor's copies.

Picture me doing the 'happy poet dance' around my studio. (Yes, it looks about as silly as it sounds!)

The start of the sock machine saga


A little while ago, I ordered a vintage Creelman Brothers Money Maker A circular sock machine off of Ebay. It got here! It appears to be in good shape, but is missing a couple of pieces that I need before I can give it a try. I need a yarn carrier to guide the yarn onto the hooks, a buckle to hang the weights from, and a pin on top of the ribber to make it go round properly. Eric found a piece of metal in the garage that can stand in for the ribber pin. I think I can jury rig a weight holder from a clamp from the hardware store. And hopefully I have a yarn carrier coming, from another seller off of Ebay. That carrier is made to fit a different make of machine, but the seller generously offered to take it back if it doesn't also work on mine. Crossing my fingers.

In the meantime, I'm starting to read a copy of the original instruction book that came with the machine, back in the 1920's. It is fairly dry reading, but every now and again the personality of the author zings through. Like this one, on how to wind the yarn onto the bobbins:

"Bobbin-winder Operators are like knitting-machines, good, bad, and worthless. The first are interested, cultivate good taste, and do their best; the second are careless, indifferent, and lack knowledge; the latter are good-for-nothings."

*giggle*

Can you imagine coming across something like that in contemporary instruction books?!

Wednesday, October 14, 2009

3d Jigsaw Puzzle


Two years ago, there was a Craigslist ad for a free loom. I'm not one to pass up such a thing, so I emailed the lady and trotted on over. She took me to the back yard, and showed me a rather dilapidated pile of wood on a tarp. Well, it was free. I took it home, and piled it in the garage until I had the time and space to do something about it. It did get put up on shelves, but well...I kind of forgot about it until we were cleaning out the garage over the past week or so. Then I decided it was time to see if I had a pile of kindling, or something that might be salvageable.

The teenagers have abandoned the living room in favor of playing video games in their own rooms, so I had some floor space available. The guys brought the pieces in, and laid them out on the floor, like this:


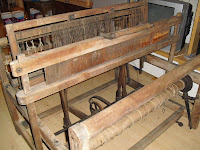
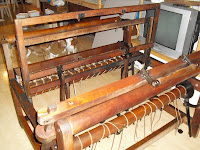
And then, I got some crescent wrenches, needle nose pliers, and a rubber mallet, and had at it. It took about four hours (and a bit of swearing), but when I was done I had this!


It is indeed a very sturdy two harness loom. The neat thing about it is that there are no foot peddles. The harnesses change when you beat the reed twice, by way of an ingenious set of gears at the bottom of the loom.


Given this clue, and a bit of paint I found reading "Reed", I tracked down some information on this old loom. It is a "Weaver's Friend" loom, made by Reed Loom Company. Reed started making looms in the late 1800's, and continued up until around 1970. Given that some of the nails on the loom have square heads, I'd say this is one of the older looms. http://www.weaversfriend.com/page1/page4/page4.html


My husband is taking the heddles with him to work tomorrow, since he has access to a way to remove rust. I gave the loom a first drink of oil, and will oil it again and rub it down tomorrow when I get home from work. The change in the wood is already apparent though.


It is in surprisingly good shape, given the neglect it has seen over the years. All the pieces seem in good working order. There are a few splits in the wood, but nothing that seems to threaten the structural integrity. All in all, I see no reason why I shouldn't be able to get this old man up and weaving again!


EDIT: Digging further, I found a picture of the same make of loom here: http://www.flickr.com/photos/library_of_congress/2163699690/ . The picture was taken between 1910 and 1915! This baby is about 100 years old.

Monday, October 12, 2009

Woolee Winder

My family loves me. They indulge me in my addiction to cool fiber gadgets!

Last week for my birthday my husband handed me a receipt. Today my present got here. It is a Woolee Winder for my Kromski Sonata. Wheeeee! I've been wanting one of these for several years now, but couldn't quite get myself to spend the money on it. But the guys heard me wisting after one once too often I guess, and now I get to play.

What is a Woolee Winder? It is a gadget for my spinning wheel. You can hear more about it here http://www.thewooleewinder.com/ , but basically it is a replacement flier and bobbin set, for winding on your finished yarn more smoothly. It is similar to how a fishing reel winds on line, with an eye guiding the yarn back and forth across the bobbin. Traditional flier heads rely on hooks to guide the yarn to the bobbin. When one spot starts to fill up, you need to stop and move the yarn to another hook. The Woolee Winder makes it so you don't have to stop and start nearly as often, which saves time. And in theory, with the yarn winding on more smoothly you can fit more yarn on each bobbin. Here, take a look:


On the left is the flier head that came with my wheel. You can see the hooks, and the yarn built up in bumps where each hook guided it onto the bobbin. On the right is the Woolee Winder. The yarn guide slides up and back along the arm, guiding the yarn onto the bobbin in a smooth even fill.


Here's a closer look at the Woolee Winder. You can see the gears there at the base which make the magic happen.

I just started to fiddle with it a bit before we all went out to sushi to celebrate my son's 15th birthday. (No Woolee Winder for him. He got the new Kingdom Hearts game and strategy guide.) It has a slightly different feel to the spinning than the original head did. Even on the lightest tension, it still feels like the Winder wants to grab the yarn out of my hands. And the gears don't want to let me pull yarn back out easily--I have to move the bobbin with my hand to get it to easily back up. I like pulling out yarn every now and again to check how tight the spin is, so I'll have to get used to the extra move for that.

That said...after I fiddled with it a bit to learn the new feel, I was able to get a nice even spin. And I could just keep going and going and going until I ran out of fiber. This is going to be wonderful for production spinning! I'm tempted to make an order at the Sheep Shed Studio for another batch of Brown Sheep mill end rovings. (http://www.thesheepshedstudio.com/Roving.html) Hmm...I wonder what colors they have in stock...

Sunday, October 11, 2009

Quote for the Day

This is from my Mom's knitting Page-a-Day calendar:

"Monday, october 12, 2009
Today is Thanksgiving in Canada, and since that's where I live, this is the day I count my blessings. I start with yarn. It's not just that I am grateful for the beautiful stuff, it's that its presence in my house signifies an enormous wealth. It means that I don't struggle for food or shelter. As long as I can choose to buy yarn (even a little) and as long as I have a place to keep it (no matter how small) I am wealthier than almost everyone else in the world."

I am indeed richly blessed!

Gourds and weaving and project planning

I've been spending time with family and friends this weekend, and getting some long neglected yard work done. The weather here in Phoenix has finally cooled down enough that we can get back outside, so I spent some time thinning out the bamboo in the back yard. (That gives me two good sized canes that are drying. Wonder what I can do with them...) We need to trim back the grape vines too--they took over the hot tub gazebo over the summer when we weren't looking. Grape vine wreaths, anyone? And the lantana flowers are totally encroaching on the sidewalk, so that will need to be trimmed too. Oh, and the bougainvilla bush is trying to grab people as they come up the walk, so that has get a good chopping too. Hmmm...maybe set up a good compost pile?

Anyway, in and around games and chores, I did manage to get some things done in the studio. I finished up a second Petroglyph Gourd, which will go into the Etsy shop as soon as I get the candle and holder for the inside of it.


Have you ever tried to get to sleep at night, only to have your personal muse come tapping on your brain? That happened to me the other night. I lay there, 2 am in the morning, and ideas kept playing pinball in my skull. One in particular formed fully enough that I had to get up and go write it down so it would just leave me alone.

So, today I went out to the shed and picked out gourds that might fit the vision. I'll work on them next week, and see if I can tease the image into physical form. If I do it right, it will make an awesome looking wall hanging. Stay tuned!


Last week at SCA practice, a friend asked me if I could give them some pointers with card weaving. So this afternoon I warped up a belt in maroon and black, so I will be able to take it with me to practice tomorrow night. This was an experiment for me. I've done quite a bit of card weaving before, but I've always used a backstrap loom to weave on. This time, I decided to put the weaving on a rigid heddle loom that I had lurking around at the back of my supply closet. That took a bit of figuring. So far, I like using the backstrap better. But I'll see how it goes once I get the hang of it.


So far, so good. We'll have to see what calls more tomorrow--the yard outside, or the studio inside. Maybe I'll just take my weaving out to the back yard, and enjoy the sun shine and warm breezes while I create something beautiful. Now, that sounds like a good plan!

Tuesday, October 6, 2009

Gourd #10: Glowing Petroglyphs

With the inspiration from yesterday's experiments in mind, I went out to the shed and picked out a gourd for today's artwork. This is what it looked like before I got started. Not very promising, is it? But there is gold hidden under the wax and mold, honest!


I scrubbed it and cleaned it out. I dyed it with leather dyes, and wood burned along the rims. I took some time researching the petroglyphs of the US South West, then painted some of them on the gourd with leather dye and a Q-tip. And then I took a dremel to the lines, to poke holes for the candle light to come through. Here is the finished product:


I am really pleased with the way it turned out! I actually designed this one in my head last night while I was modeling. Hey, you have to do something when you can't move for 40 minutes, you know?

There is a sale pending on this piece, so you won't see it in the Etsy store. But I like it so much that I'll probably make a similar one sometime soon.

Proof of concept: Gourd candle holders

I'm back to playing with the gourds again. There has been an idea rumbling around in my head, on how to make a candle holder where the light streams through holes in the side of the gourd. I decided to experiment, and test whether or not I could make it work. This isn't a finished piece--just a test of concept. I tried poking holes with an awl, and that worked for smaller holes. But just poking holes doesn't work so well for larger holes--the gourd tends to crack. However, a dremel seemed to work just fine.


I tried sharpie marker on the outside. It doesn't smear after the gourd is sealed with the matte finish spray I use, but I'm not convinced. I think when I do a finished piece, I'll go back to using the leather dyes, with detail work possibly in wood burning. I really need to get my hands on some of the specialty gourd ink dyes. Maybe I can invest in them after I've sold a couple of these.

Stay tuned for the finished candle holder! I've got the design in my head. Now I just need to get it into tangible form...

Friday, October 2, 2009

New toy! Circular Sock Knitting Machine!

I've only got a moment before the D&D gang gets here, but I had to share. I sold one of my floor looms today. With the proceeds, I bought this:

http://cgi.ebay.com/ws/eBayISAPI.dll?ViewItem&item=370266628251&ssPageName=ADME:B:EOIBSA:US:1123

The seller says it was making socks within the past year and a half, so I'm crossing my fingers that it is functional. I want to play with it. My guys want to reverse engineer it, and see if we can make something similar, since there is only one company in the world making these today.

Happy early birthday to me! I turn 43 on Monday, and this is my present to myself.

I can't wait...

Thursday, October 1, 2009

Life Drawing class

Well, I didn't hear any great outcry that nude figure studies would offend you all, so I figure my day job is fair game to talk about here.

The classes all tend to start the same way. The teacher will have me do a series of one to three minute 'gesture' poses. This set was all two minute poses. I'll put on some upbeat instrumental music, and have at it. The students leave behind the worries of the day, and the charcoal (or pencil or sharpies or ink brushes or...) begins to fly across the page. This is a great warm up, and gets them used to grabbing the intent of the whole pose without over thinking it. I think these are my favorite to do. It challenges me to come up with a whole series of interesting poses, and since they are only a couple of minutes long I can hold positions that would leave me in the ER if I tried them for half an hour or so. (Like that one in the lower left. I am so not doing a back bend over a stool for longer than 5 minutes!)

Then we move into the lesson for the day. This week, the teachers were doing half hour to hour long poses, and the subject was light and shadow. This first one was a half hour pose. This is obviously a working drawing, but it gives great insight into the thought process behind trying to catch the drawing. In addition to the more finished figure, you can see how she pulled out an outline of the figure to check proportions, and sketched a couple of body parts to get the right angles and lighting.

This was the second pose for that class, and was about 45 minutes long. The assignment was to map out the positions of the shadows on the body, and then place them in with directional lines. They'll work up to rendering later. This assignment was line work only. I love how she worked both on and off the form to get the lighting.


Same topic, different teacher, different approach. This was an hour long pose (with a break at the half hour mark). I recycled the pose from the other class, since it seemed to work well. This teacher had the students pull out black or dark colored paper, and had them use a white pencil or white conte crayon only. The students had to draw in the lights, and leave the paper to be the shadow. Boy, did this throw folks for a loop! We are so used to working on white paper and drawing in the dark parts, that this messed with their brains. But, it forced them to really look at what they were doing, instead of sticking with what they 'knew' things ought to look like. Great exercise!