Saturday, February 26, 2011

Kicking into gear


Estrella War, the SCA event I went to last week, was absolutely marvelous. It was a week long party with 3000 of my closest friends, including folks that I really only get to see once a year. And I got to help out at the period demo center on Friday morning, talking to scads of grade school age kids about what our ancestors went through to make clothing. I think they were most impressed by the idea of the pink/purple color of the yarn that we dyed with cochineal, especially when I explained that cochineal was bugs that you find on prickly pear cactus around here. Color from squished up bugs is just the thing to grab the attention of bored grade school age kids--especially the boys.

But now Estrella is over, and I've almost got resulting laundry and dishes done. I was feeling kind of let down and at loose ends, coming off of the high that that event gives me. I wasn't quite sure the direction I wanted to go...and then my husband came home yesterday to tell me that he had lost his job. Which is actually probably going to be good for him personally, but the timing seriously sucks.

Well, I have a direction now. I've been letting the Etsy shop slide over the past few months as I worked on the fabric for the Estrella arts display. Now it is time to kick the Tangible Daydreams business back into high gear, so I can make more of a contribution to the household than just my life drawing modeling gives. Over the next while, I'll be putting in many more hours in the studio, and listing lots of items.

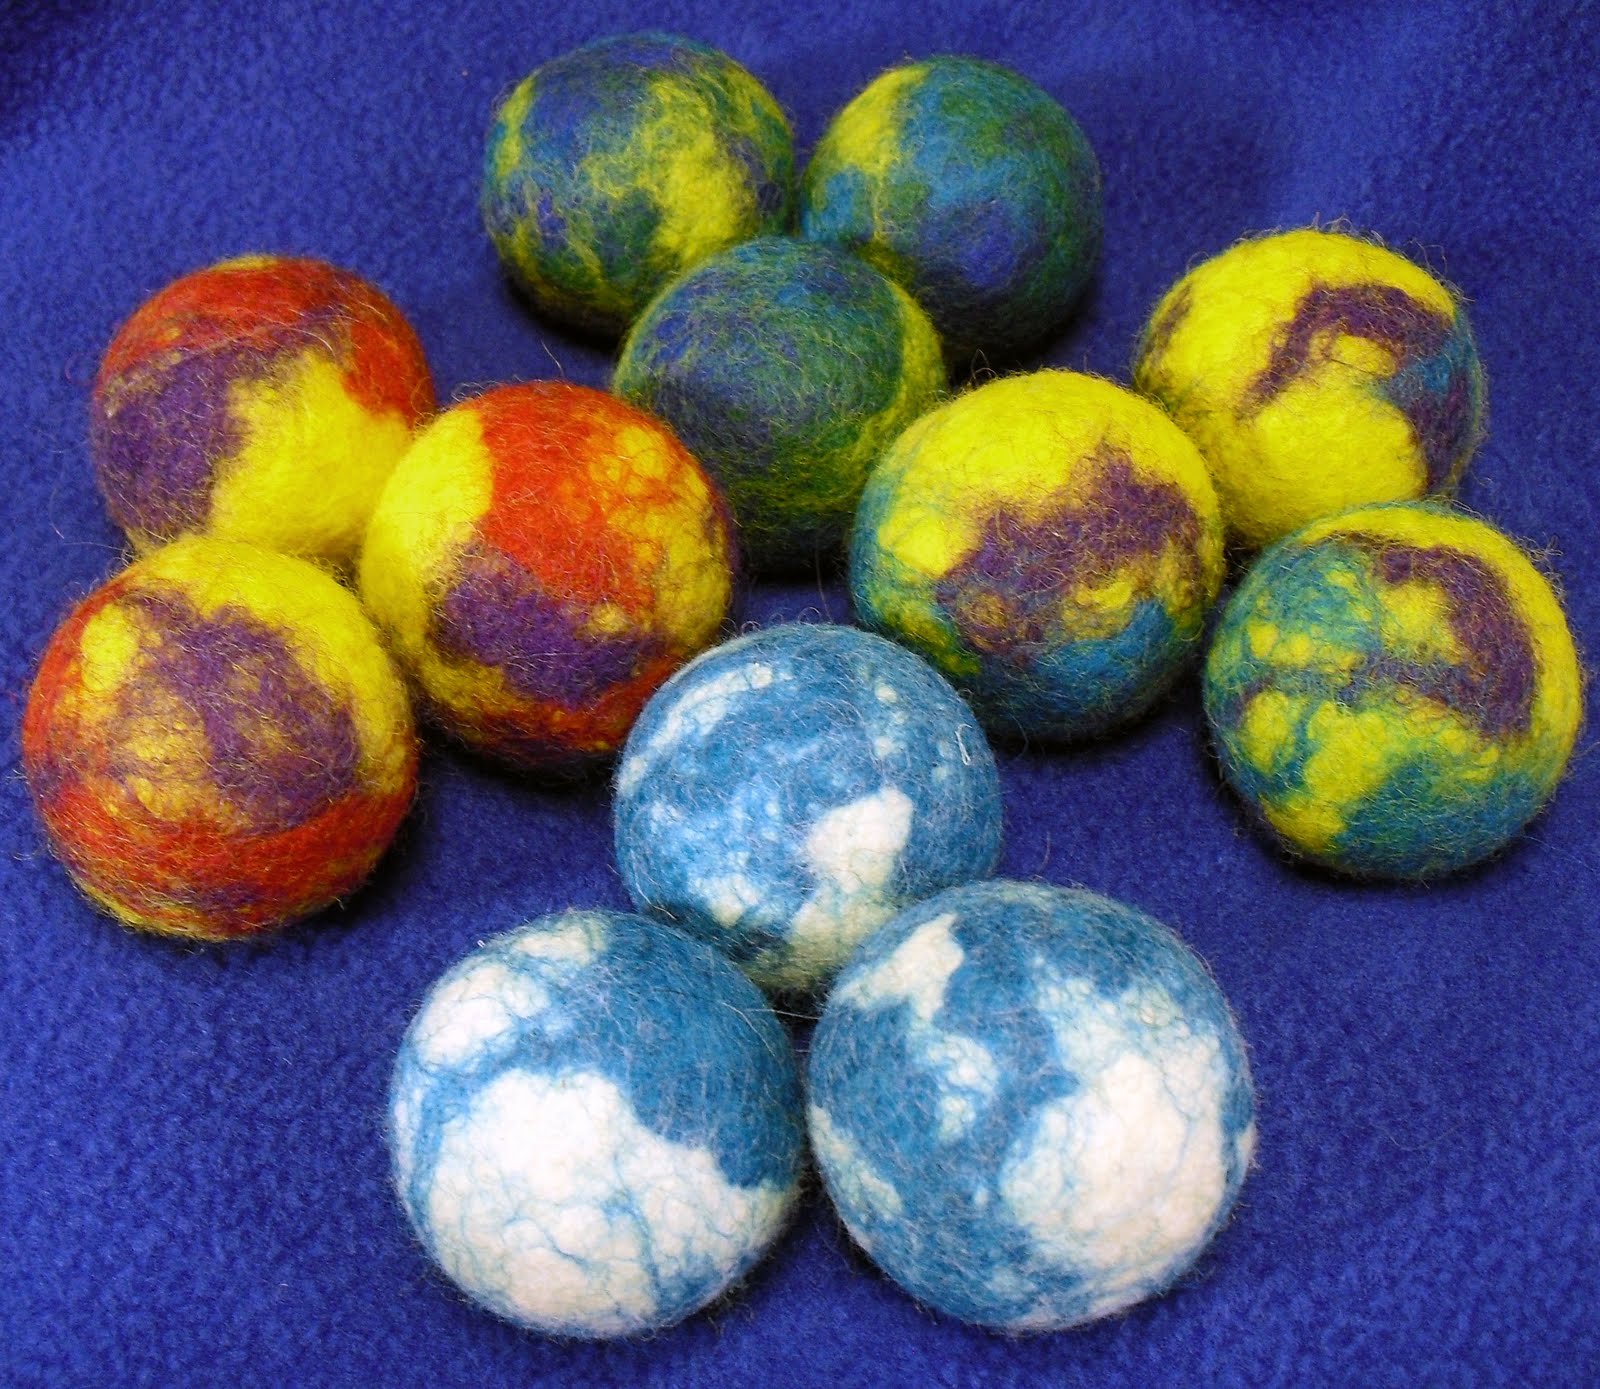
For instance, yesterday I dug out the golf balls and the wool roving, and made up four new sets of juggling balls. These are actually my best sellers out of the Etsy shop, and my stock was getting low.


While those were drying, I also started to rummage through my stash of shawl yarn. Before Estrella, a friend found me a batch of Red Heart 'Baby Clouds' yarn. I put it aside at the time, but dragged it out yesterday and started matching colors. I decided on a pretty pastel peach and some bright white, and mapped out a two color plaid on the triangle loom. I've gotten the weaving part done, and now I'm working on cutting and tying the fringe. I'm actually rather pleased with the way this one is turning out. The colors make for a very subtle and delicate pattern, which I could totally see as a wedding shawl. The yarn is a little thicker than the Lion Brand Homespun that I often use, so it is packing in a little tighter and making a more stable weave. But it isn't as tight as some that I've tried, so it should still drape well once I get it off the loom.


(Ignore the dark shadow down the middle of the weave. That is the support for the easel behind the shawl.)

I should be able to get that shawl finished up tomorrow. Then I've got several more shawls worth of the same yarn to work up, as well as yarn enough for a dozen or so pairs of socks. Oh, and while I was at Estrella I picked up a copper focal pendant that will make a great center bit for one of my gourds. Come to think of it, I probably have enough materials in my stash to work steadily for a month or so, without having to buy supplies.

Now, it is time to quit freaking out, buckle down, and do the work. I need to have my crafting finally take the step from a hobby into a real, bill-paying business.

Eep.

Deep breath...Ready? Go.

Friday, February 11, 2011

Sewing for Estrella, and modeling for life drawing

Oh man, am I sore again. This semester I'm working with 6 different teachers of life drawing classes, and this week I modeled for each and every one of them. It was only about 16 hours of work...but imagine if you worked out at the gym for 16 hours in a week's time. Yup. My muscles are talking to me. Mostly whimpering, and asking for the hot tub pretty please. But I'm kind of stubbornly proud that I can help the learning process in this way, and that even at 44 years old I'm fit enough to do the job well. Also? There were two paintings of me on display at a professional art exhibit this week. How's that for kind of making for weird feelings?? They were evidently done from class sketches like this one:


(Hopefully that one is work safe enough not to freak anyone out.)

In and among the class work, I've been able to get some more prep done for the upcoming Estrella War. (estrellawar.org) I still need to write the documentation for the fabric I wove for the arts competition, but I was really pleased that the matching linen (from fabrics-store.com) came in today. The hand woven will end up being a nice warm over-tunic, and the linen will be the under-tunic. I need to enter a length of fabric ready to be made into something for the competition, so the actual construction of the outfit will wait until after I get back. But won't it be beautiful? I'm so pleased the colors matched as well as I thought they might.


My husband is kind of hard on his clothes, and I hadn't sewn for him in a couple of years. So I made him the fingerloop braids (http://tangibledaydreams.blogspot.com/2011/02/tutorial-basic-finger-loop-braiding.html) to fix the cuffs for one shirt, and then sewed him another one. This is from the McCall's M4864 pattern. There were some fiddly bits around the cuff and collar with getting all the gathers tucked in correctly, but I'm pleased with the way the shirt turned out. And the XL fits my husband beautifully, with plenty of ability to move. Since he's not a small man, and is very active, that makes this pattern worth the little bit of fiddling and hand sewing. Yes, I really hate hand sewing. But I'll be using this pattern again. (And it looks better on him than it does crumpled up on the ironing board. Really.)


This was an easier project. McCalls Easy Stitch 'n Save M5738, minus the collars because Joann's didn't have enough of the yellow bias tape to go around. The dog coats run a little large for what the measurements call for, and I had to shift the placement of the belly strap for the smaller dogs. But the pups didn't mind wearing them. Actually, when I tried to put a coat on Kaylee, Wash tried to nose his way in to get the pretties instead. He even did the roll over and show his belly trick as a way to beg for the coat. I think maybe he just wanted all the attention for himself, but it was still cute to see them jockeying for who got to wear the new clothes. Luckily, I made up three of them.


You can almost hear them saying, "Ok Mom, we're in our new garb. Is it time to go yet???"

Saturday, February 5, 2011

Tutorial: Basic finger loop braiding

I'm in the middle of making Medieval/Renaissance style costumes for an upcoming SCA event. A few years ago I had made my husband a shirt with ties to close the wrists and neck. He's kind of hard on his clothes however (being a rapier fighter will do that), and the wrist cuffs needed repair. Part of the repair meant that I needed to make new laces. I do this by making a very basic finger loop braid. I learned the skill through a Compleat Anachronist publication, which you can find reproduced here: http://fingerloop.org/. But I know some folks who learn better by actually seeing, so I had my daughter snap a few pictures while I was setting up the braid.

Here's what I did:

For this braid I am using DMC embroidery floss, in two colors of blue that will go with my husband's shirt. I like working with loops that are about 6' of string doubled over into a 3' loop. The floss I was using was already cut into 3' lengths, so I just tied 2 together to get the lengths I needed. I ended up with 3 dark lengths, and 2 light lengths.


I wrapped the lengths of string around a handy table leg, and lined up the ends.


Then I tied the ends together...


...and flipped the circle around so the big knot was behind the table leg.


Then I put each loop on a finger. The dark loops went on the first three fingers of my left hand. The light loops went of the middle two fingers of my right hand. Now I was ready to start braiding.


I reached my right index finger (and thumb, just because) through the loop that was on the middle finger of my right hand.


With the right index finger, I grabbed the bottom part of the loop on the ring finger of my left hand, from the outside bottom of that loop (as opposed to sticking my finger inside the loop to grab the bottom string).


Then I pulled the loop on the ring finger of the left hand through the loop on the middle finger of the right hand...


...ending up transferring the loop from the ring finger on the left hand to the index finger on the right hand.


Then I pulled my arms far apart, which moved the resulting interlacement down to the end of the braid. This is the move that controls the tension of your braiding.


Ok, that is one half of a repeat done--time to do the same thing on the other hand. To set up, I walked the loop on the middle finger of my left hand down to the ring finger on the left hand.


Then I walked the loop on the index finger of my left hand down to the middle finger of my left hand. I usually combine this step with the next one, which is again to use my index finger to reach through the loop on my middle finger.


Grab the bottom string of the loop on my right ring finger, from the outside.


Then pull that loop through the loop on the middle finger of my left hand.


The loop transfers from the ring finger of the right hand to the index finger of the left hand.


I pulled the arms far apart, to tension the braid. Then I walked the loop on the middle finger of the right hand down to the ring finger, and the loop on the index finger of the right hand down to the middle finger. That is the end of a repeat. Start back at the beginning of the braiding.


The resulting braid is totally flat on one side, and slightly raised on the other. Once the loops get too small to work with, I just tie a knot in the end to keep it from unraveling.


My braids ended up about 2' long, and are very attractive and sturdy. They make great laces for dresses, or for drawstrings in pouches. I've used them for hair ties. My kids used red and green knitting yarn, and made Christmas book marks. Grade school kids used to love these for Friendship Bracelets. (My kids are older, so I don't know if those are still the rage.)


And, of course, they'll make great ties to close the cuffs of my husband's costume.

Tuesday, February 1, 2011

Fulling and finishing the Estrella weaving project

I did the finishing work on the Estrella weaving project today. I am really tickled with how it turned out!!

First, I had to do a little bit of work with scissors and needle. I trimmed all the tail ends where I had started and stopped weft threads. Then I dealt with the couple of spots where I had repaired broken warp threads. I didn't actually break any threads in the weaving process, but I had snapped two in the warping process. At the time I just knotted them back together, and then I did a splice when I got to that spot in the weaving.


But that left me with a start and a stop, with a little gap in between them.

So I needle wove one of the threads back up the web, so the warp threads overlapped by about an inch.


After all the threads had been appropriately taken care of, it was time to wet finish the fabric. Before wet finishing, the fabric measured an inch sort of 10 yards long x 25" wide, which was larger than I needed. And it was kind of scratchy.

The solution? Fulling. Fulling the fabric exposes the wool to water, heat, and agitation in order to mesh the fibers together into their finished position, and to shrink and soften up the fabric. Before the invention of the fulling mill, one way Medieval folk did this was to put the fabric in a large vat of water. Then they added fuller's earth and stale urine to the mix, to scour away any remaining lanolin, dirt, and grease.

I skipped the fuller's earth and stale urine part. The roving I used already came with the lanolin scoured away. Besides...ewww. Because the next part? The fuller got into that vat, and stomped on the fabric.
For long amounts of time, if my experiments are anything like the historical reality. After a half hour of tromping around to some inspiring Irish jigs, my tub looked like this:

The water was blue with the extra dye that was rinsing out of the fabric. The fabric itself? Well, the fulling was starting to take place. The fabric had shrunk a half inch or so, and the fibers were fluffing and blending.
But I was sweating, my legs were beginning to ache, and my knee was giving out. This was harder work than it looked like! Medieval fullers must have had legs of steel, impressive stamina, and the patience saints.

I wanted to shrink up my fabric from 25" wide to 21" wide, to give the width I needed for my eventual sewing project. I decided that I understood why the Medieval folk invented the water wheel driven fulling mill as the first part of the fabric making process to be mechanized. And lo and behold, I had access to my own version of a fulling mill.

Yup. Another 15 or 20 minutes in the wash, and the fabric had shrunk down to the 21" width I needed, and was 8 yards 2' long. The colors had blended, the fibers had meshed, the fabric had plumped up and the surface had softened.
Done! (insert happy dance here) I tried laying the fabric out flat to dry in one long strip...

...but today was very very windy. It wouldn't stay put. So I brought it inside, and the finished fabric is currently on a drying rack over my tub. Do you see that cool stripe pattern that showed up? Not planned. It is a result of an inconsistency in how thick I did the various skeins of hand spun yarn. I like it, but it tells me that I need to work on my spinning some more.

Now, all I need to do is write up the documentation for the competition, and this part of the project is done!