Thursday, January 28, 2010

Modeling begins for the semester


The semester has started back up, which means I'm back at work as a life drawing model. I did three classes yesterday, and one this morning. At three hours each, that is 12 hours of modeling in the past 2 days. Oh man am I sore right about now!!

But, it is worth it. I get a kick out of seeing the new students catch fire as an idea clicks. I enjoy joking around with second and third semester students. (But, I'm still not going to stand on my head for 45 minutes! No matter how cool the drawing would be.) And I dearly love modeling for the ongoing students. Several of the students in the evening class are professional artists, taking advantage of having access to a live model to keep in practice.

For instance, the two drawings here are half hour/40 minute sketches by artist Kevin Kibsey. Can you imagine drawing that well, in that limited an amount of time? He's awesome. If you are an art collector, I'd really suggest you look him up and grab a couple of his paintings. Check it out here: http://www.villasandverandas.com/kk.htm . His 'Blue Dancer' is one of his more recent pieces. I saw it in the works, and it is spectacular--I love the motion that he got into the dancer's skirt. He's got a violinist that he's working on right now, but I think that one is already spoken for.

Anyway, you'll hear more about modeling on and off, now that things have started back up again. Tonight though, I think will be a hot tub kind of night, to work the kinks back out.


Tuesday, January 26, 2010

Sekanjabin and dried fruit

I started on the food preparation for Estrella today. On today's to-do list was to make the sekanjabin, and dry some fruit. This isn't exactly fiber arts, but it does tickle the creative side of my brain, so here you go:

Sekanjabin is a middle eastern drink, and was mentioned back in the 10th century. There are lots and lots of variations on it around. This is the recipe I use:

Sekanjabin

5 lbs honey
4 cups water
2 cups apple cider vinegar
1 big handful mint


Dissolve the honey in the water.


Bring to a boil. (Watch it so it doesn't boil over. My son burned himself last year doing this, and still has a scar.)


Turn down the heat, and add the vinegar. Simmer for at least half an hour.


While it is simmering, go pick a large handful of mint from the garden. (Ok, you can get it from the grocery store, or use mint tea bags if you can't get fresh. But I have a couple of pots growing just for this recipe.) At the end of half an hour (or so), take pot off the heat and stir in the mint. Let it sit to cool for a couple of hours.


After the sekanjabin is completely cooled, strain off the mint.


Pour the resulting syrup into a bottle. (I just re-use the honey jar, plus another random drink bottle.) The syrup will last for months unrefrigerated.

To use: dilute the syrup approximately 8 parts water to 1 part syrup, or to taste. It is good both hot or chilled.


My kids call this drink period Kool-aid. They'll take a swig out of a water bottle to make room, then add the syrup to the bottle and shake it up. My husband really likes to drink this hot around the camp fire at night. You can substitute sugar for the honey, and other types of vinegar for the apple cider vinegar. Other flavorings besides mint can be used, as well. Experiment, and then let me know what works for you!

I also got a batch of fruit drying on the dehydrator.

My kids really love dried pineapple. I watch for the store brand of canned pineapple to go on sale, and then stock up. Two cans make one tray of fruit for me. I get the slices in syrup, and cut the rings in half right in the can. The juice I drain off and chill for my husband to drink as a treat.


Apples were on sale too. I have a gizmo that peels, slices, and cores the apples. That makes this process so much easier!


Two apples make one tray of fruit for me.


My dehydrator was a Christmas gift last year, and it is going to get a work out over the next couple of weeks! It can dry nine trays at a time, which is a lot of dried fruit. Or beef jerky. The beef jerky will be later this week, I think. I may also make fruit roll-ups, of dried applesauce. Hmmm...what to make next....?

Monday, January 25, 2010

So much to do, So little time.


Two weeks from now, I'll be at a historical recreation event called Estrella War. (http://estrellawar.org/) This event is really the highlight of my year. I've been attending every one since my 17 year old daughter was a babe in arms, and have loved every single one. Well, I could have done without the weather some of the years (having your wood pile floating downstream on the flood waters was special), but we always manage to get through with laughter and camaraderie. My pictures from last year's event are here: http://s15.photobucket.com/albums/a366/lissamc/Estrella%2025/.

Basically, it is 5000 of my closest friends camping in the desert for a week, pretending that we are back in the Middle Ages / Renaissance. The knights in shining armor lead the charge of the clashing armies. The artisans hold classes and competitions and displays. The shop keepers tempt us with hand made goodies. Kings and Queens from around the Known World stroll, surrounded by their court and guard. Hounds course, children scamper, and over it all the tang of wood smoke floats on the air as folks cook gourmet meals over an open fire.

Can you tell I love this time of year?

However, there is a heck of a lot of prep work that needs to be done between now and then. Lets see...

My daughter and my husband both want a couple of more pairs of pants made.

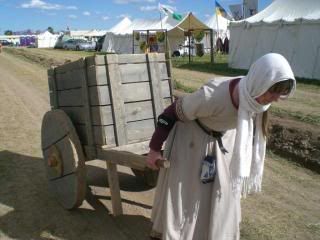
I'd like another tunic set like I'm wearing in the above picture.

I'm going to be demonstrating textile arts, so I really should pre-warp my traveling loom.

I have quite a bit of food preparation to get done. This includes making and freezing stew, making oat cakes, drying beef jerky, drying fruit, making 'Kid chow', and brewing up a batch of sekanjabin syrup.

I also have two orders for hand made socks, to be delivered at Estrella.

In addition, we need to pull out the trailer, make sure everything is in working order, and pack.

Not so much, right? Right! So the posts for the next several weeks will be a study in how to prepare for a major camping event. On your marks...get set...GO!


(Oh...for you internet stalkers out there. Just because I'm going to be away from the house does not mean that the house will be empty. Try someone else.)

Thursday, January 21, 2010

More yarn

I took a break from the socks today in order to finish up some of the roving I've been spinning. This is some of the stuff that I got from the Sheep Shed Studio. It is a black and dark brown wool, with smattering of white mohair to give a halo effect. I spun it up into a soft and fluffy knitting yarn. Total available: 4 skeins, totaling 295 yards. It will go up into the Etsy shop as soon as I can get some good pictures taken.

Wednesday, January 20, 2010

Knee socks: almost there!

I made yet another stab at the knee socks today, and I think I'm almost there!

My last attempt moved up to the 72 cylinder. It fit around the calf, but was too baggy through the ankle and foot. This morning it occurred to me that when I put on the heel spring, the tension tightens up. What if I put the spring on when I got to the ankle, and just left it on until I was done with the foot? Off to the sock knitting machine I went!


Lo and behold, it worked. Leaving the heel spring on tightens the tension from 13 rows per inch to 15 rows per inch, and brings in the circumference. I went ahead and made the matching sock to the one in the picture, and I'm wearing them now. They are comfortable, and the ankle and foot fit beautifully. The leg of the sock fits nicely over the calf. However, the leg of the sock is scrunching down after several hours of wear. I think I need to make the cuff bigger, and perhaps a bit tighter. And I need to lengthen the leg so the top of the sock hits well above the biggest part of the calf. I think those changes will keep the body of the sock where it belongs.

So close!

Monday, January 18, 2010

Product development: socks and hair sticks

I tried the knee socks again, this time with the bigger cylinder I have for the circular sock knitting machine. I got the leg to fit nicely over my calf...but now the ankle and foot are too baggy. I'm not really surprised. My calf is, in fact, bigger than my ankle.

So, I dug back into the original manual that came with the machine some 100 years ago. (Ok, I don't have the original, but there is a copy on line that I printed out.) The directions for a high sock there suggest that you remove every fourth needle when making the ankle. Then, before the heel, you put back in the needles that will knit the underside of the foot. This makes a mock ribbing. I did a test run, cranking out about 90 rows of tube with every 4th needle removed, then slipped the tube on over my foot. It is noticeably tighter around than when I have all the needles in. So the theory is sound. Hopefully I can give it a try tomorrow--I'm a bit tired to be experimenting with something new tonight.

And just so this post isn't totally lacking a photo, let me show you what else I've been working on. I recently got a batch of bone hair sticks that had holes drilled in the top. I finally tracked down screw-eyes that would fit in that hole, and have started digging through my bead stash to make dangles. Here's the first set done:


Watch for a line of hair sticks and hat pins to be added to the Tangible Daydreams Etsy shop in the next few weeks! A pair of hair sticks will be running around $15.

Saturday, January 16, 2010

Circular Sock Knitting Machine videos

I found a wonderful video that covers some of the history of the Circular Sock Knitting Machine. Here is part 1, and part 2. Fascinating stuff!

http://www.youtube.com/watch?v=uBdmqYTTK7c
http://www.youtube.com/watch?v=id-JsTMiBEs&feature=related

Friday, January 15, 2010

Mission: Knee Socks

I've had several requests for knee socks from my circular sock knitting machine, so it is time to try to develop them. My first issue is finding the right yarn. The yarn I've been using is a little thick for the machine, so I ordered some alternate wool sock yarn from Webs. I tried it today for the first time. It is much thinner than the other yarn I've used, and my machine loves it. It is nicer to the touch than the other stuff, too.

Of course, since it is so thin I've had to up the tension, so there are more stitches to the inch. I tried a sample knee sock, using the 54 cylinder. On the plus side, I hardly dropped any stitches. On the minus side, even with the tension cranked all the way up, I can still see my foot through the stitches. It needs to be tighter...but as it is the socks are too narrow to fit comfortably over my calf.

Ok, I'm going to rip that sock out so I can re-use the yarn. The next attempt will be on the 72 cylinder. Stay tuned.

Wednesday, January 13, 2010

Etsy Treasury

How fun! My Grey Gotland handspun yarn was just included in an Etsy treasury. http://www.etsy.com/treasury_list.php?room_id=105938

Monday, January 11, 2010

First batch of spinning from the new roving

If you recall, the other day I got a shipment in the mail of mill end roving from the Sheep Shed Studio. This is lovely, high quality wool from the Brown Sheep company, that they couldn't use for some reason. I broke into the cream and brown roving, and quickly discovered why this particular batch wasn't up to being able to be used in the mill.


The roving was full of slubs of fibers, that weren't incorporated into the rest of the roving. If you tried to spin them, the yarn ended up lumpy bumpy, with weak spots. However, the slubs were really easy to strip out by hand, leaving me with quite a bit of usable spinning fiber. I'm sure it was not time and cost effective to do this in a factory setting, but a hand spinner had the advantage here.I'm also left with a bag full of slubs, which I'm planning on using in felting. They're just about the right size for the juggling balls and camera cases I make.


Once the slubs were stripped out, the fiber spun up beautifully!


After filling the bobbins with singles, I plied them together into a two ply knitting yarn. Then I reeled it off onto my weasel (antique clock reel) to measure how much yarn I ended up with. Each time around the arms of the weasel is 2 1/2 yards. I spun three skeins of yarn, for a total of 215 yards.


Look how straight the skein of yarn is hanging! That means I got the plies balanced perfectly in the finished yarn. This should knit up nicely with no biasing.


A before and after shot. The finished yarn almost always looks darker than the roving.


To wet finish my yarn, I let it soak in hot water for a little while. This allows the fibers to move into their finished position. Then I gently squeezed out the yarn...and smacked each skein a couple of times on the floor. This helps the fibers lock together and bloom.


My high tech drying station. The skeins had better stop dripping water before I need to take a shower tonight!

Once the yarn is dry, I'll take pictures of the finished product. The yarn is soft to the touch, and would make a lovely warm winter scarf. Or, with that cream heathered base, I bet it would dye up beautifully. Hmmm... Well, I'll pop it into the Etsy shop until I decide what to do with it.

Friday, January 8, 2010

Time to Spin!!


The mail man just dropped off a package for me, and I couldn't wait to rip into it. Like a kid at Christmas time! I knew from the 'Sheep Shed Studio' return address that it was going to be good.

What was in it, you ask?


Roving! Pounds and pounds of Brown Sheep mill end wool, all set to be fed into my spinning wheel. Check it out here: http://www.thesheepshedstudio.com/Roving.html .
They usually just have the brown/black/cream tones, but every once in awhile they get some colored roving in as well. If you catch them at just the right time, you can grab some of it.

So, I got 5 pounds of blue, 5 pounds of red, and a pound each of some of the brown tones. They threw in several ounces of teal/blue/purple dyed superwash as an added thank you bonus. Take a look!


Now mind you, I'm not sure where I'm going to store it all. It certainly isn't going to fit back into the box it came in. I'm not quite sure how they got it all in there in the first place! What I am going to do though is drag out my Kromski Sonata spinning wheel, with my handy dandy Woolee Winder attachment, and go to town with production spinning. Look for some large batches of knitting yarn to show up in the Etsy shop before too long!

Ok, I'm going to go play Fiber Breathing Dragon now, and sort through my treasure trove. Picture me doing the happy fiber artist wiggle dance just about now...

Thursday, January 7, 2010

Christmas is done!


There! Finally done. It only took me to a couple of weeks past Christmas to finish up all the presents this year, so I guess I'm not doing too bad.


The kids had both been in and out of my studio in the weeks before Christmas, looking over my hand-dyed sock yarn and Strongly Hinting as to which color scheme they would like. So for Christmas morning, they each got to unwrap one skein of yarn, with an IOU attached. Yesterday and today, I finally cleared my schedule enough that I had time to crank up the socks on my Creelman Brothers sock knitting machine.

Kevin's socks are the green ones. They were knit on the 72 slot cylinder, as follows: 20 rows, then hang the hem. 30 rows, then turn the heel. 70 rows, then make the toe. (I'm not using the ribber at all on these yet.) This made up into a nice size 12 mens sock.

Michelle's socks are the orange ones. She likes her fire colors! This pair was knit on the 54 slot cylinder, as follows: 20 rows, then hang the hem. 35 rows, then turn the heel. 60 rows, then make the toe. She wears a size 10 womens shoe, and as you can see the socks fit very nicely.

The yarn I'm working with is a little thick for my machine, so I probably won't order any more of it. I had the tension down at the half-way mark to make these work without my machine dropping stitches all over the place.

Next up: my family gave me two yummy snuggly skeins of sock yarn for Christmas, to make up for myself. And I have a cone of white wool, thinner than the stuff I've been using, that I want to experiment with. One of these times, I'm going to find the perfect sock yarn!

Tutorial: Fringe on the tri-loom

I was finishing up a tri-loom shawl today. It is done in Lion brand Homespun yarn, in soft creams and earth tones, and will be shipped off to Shane's Granny in the next day or so. By this point, adding fringe to the shawls is old hat to me, but as I was working it occurred to me that not so very long ago I had no idea on how to do this. This may be simple for most of you, but for those of you who like me had never added fringe to anything, here's a few pictures of how I did it:


First off, I figured out how long I wanted the fringe to be. I doubled that length and added a bit, because the yarn will be doubled over and knotted on the shawl. Then I found a book that was the right size and wound my yarn around the book. Then I cut the yarn. Much better than cutting and measuring each piece of fringe one at a time! I knotted the ends of this yarn, since it is prone to fraying if not controlled. Then I used a hair tie around the bundle of yarn, to keep it from tangling before I got to using it.


Once I had the yarn cut and tied, I grabbed a crochet hook that would fit between the pegs on my loom. I like nice full fringe, so I grabbed two strands of the cut yarn.


I doubled the yarn over the index finger on my non-dominant hand, lining up the cut ends together.


Now, I took the crochet hook and went between the pegs, up under the yarn and into the first little square formed by the weaving. I slid the loop of yarn on my finger over the crochet hook, and turned the hook downward so I could catch the loop in the next step. (I know it shows me doing this all one handed in the pictures, but I actually use two hands for this process, with the hook in my dominant hand. I had to hold the camera somehow though, and my toes just aren't that nimble.)


I pulled the loop through the opening and down.


Some people are good enough with the crochet hook to use it for this next step. I'm not. I store the hook in my spare hand while I reach through the loop with my dominant hand in order to grab the fringe.


Pull the fringe through the loop.


Pull down with one hand, and use the other to snug up the knot nice and tight, evening up the ends as you go.


I usually start at one corner of the shawl, and work my way down the loom to the bottom. I add extra fringe at the bottom, just to make sure it looks full enough. Then back up to the top of the other side, and the shawl is ready to bind off and take off the loom.


Doesn't this look all snuggly and soft? I love wrapping up in these shawls! The fringe really is the finishing touch, making it feel deliciously luxurious.


(This yarn is machine washable, but I find fringe tangles in the machine if you're not careful. To wash, I put it in the washing machine on the 'handwash' cycle, then lay the shawl out flat to dry. Haven't had a problem yet.)

Sunday, January 3, 2010

Christmas on the Dobby loom

I think at this point it is safe to post pictures of this project, because all the recipients should have received their Christmas present by now. I hope!

Some time back, I got a new-to-me dobby loom. I decided I was going to start it up for Christmas this year, and each of my relatives on my side of the family was going to receive a matching hand-woven napkin in Christmas colors. I chose an extended point twill pattern out of the book "8,12...20" (p 64; Fig 134), and did my figuring. I ended up using red and green 8/2 unmercerized cotton set at 22 epi for the warp, and white 10/2 mercerized cotton for the weft.


It was a bit of a learning curve to get the dobby loom warped up. I am used to warping front to back with sticks to separate the warp. The dobby is set up with a raddle in back, and recommends warping extra tightly with paper to separate the warp layers. I eventually got it.


Here is a shot of the front of the loom, with the pattern started. I had to sample for a couple of inches, because when I made the pattern I had some floats that were too long. I also had the warp set too closely on the first try, and had to fiddle with that. I eventually got the pattern dialed in.


My loom wraps the finished fabric right around the front beam, which is new to me. I put about 11 yards of warp on the loom. After cutting off a batch because I had the set too close and had to re-sley, and accounting for loom waste and take up, I still had over 9 yards of finished fabric wound around the beam when I was done. I don't think I could fit much more without it interfering with the weaving process.


I had a hard time deciding which side of the finished fabric I liked more!


And here is the finished project: 15 Christmas napkins. Finished size after hemming was 17 1/2 inches square.


I've decided I really like the dobby. The weaving was simple, once I got it set up properly. Now, to figure out the next project...

Friday, January 1, 2010

Happy New Year!

Happy New Year, folks! My wish for you: that the coming year is full of new techniques to learn, new gadgets to play with, and new materials to explore. 12 months from now, I hope you have had the time to start with untamed daydreams, have been able to find joy in the creative process, and have ended up with a thing of tangible beauty to hold in your hands.

And now, to sleep...