Thursday, November 21, 2013

The difference a weft color makes, and a big decision


Isn't it fascinating, the difference the weft color can make in a weaving project? I've been weaving baby wraps. I can fit more than one wrap on the same warp on the loom, but I like to make each finished product a bit unique. So, unless requested otherwise, I will change weft colors from one wrap to the next. (The weft is the thread that goes crosswise. The warp threads go longways.) In this case, I used a black weft for the fabric in the top part of this picture, and a teal blue for the fabric in the bottom. When I got the fabric off of the loom, I washed it and then cut the two projects apart. The finished wraps are obviously related, but still different from each other. I'm just not sure which one I like better!

Speaking of weaving baby wraps...I've been getting custom orders for wraps in the last few weeks. Lots of orders. Which is awesomely exciting, and still rather overwhelming. At the rate I'm going, I have custom requests backed up through the end of November of next year! That won't do at all. I have to find a way to speed up my process. Which means I need to squeeze more hours of studio time into my week. Which means...


...Which means I'm putting my best foot forward, and going full time in the studio. Yes, I put notice in today at the local community college that I won't be back next semester to model for their life drawing classes. I just don't have time to do that, and to still make the deadlines I've set at the loom.

Yikes!!!

I'm scared. I'm excited. I'm overwhelmed. I'm nervous. I'm thrilled. I'm.....I'm behind on my current weaving project because I modeled this week. Back to work!!!

(Drawing by Jan Trisler, of TriPal Studios.)

Tuesday, November 12, 2013

Baby wraps, and unexpected gifts from the dye pot


Here's how the prototype baby wrap turned out, modeled by the lovely lady that was the inspiration for the project. Is that not just the most adorable baby ever??

Now that word has gotten around that I can do custom wraps, my project list has rather exploded. Given an estimated time to complete a project of two weeks, I'm booked until...lets see...some time in April currently. Time to get to weaving!! Next up on my to-do list is to figure out how to squeeze in more time in the studio, around family, day job, other projects, and my historical recreation activities.
"Just keep weaving...just keep weaving...."


This is the wrap that is currently on the loom. The client picked out 4 colors of grey fiber reactive Procion dye, and requested warp painted stripes that alternated the grey and white, set off by thin stripes of black. When you dye your own yarn however, you're never quite sure what you're going to end up with. In the hand painting process, the greys diluted down a bit and their undertones really came through. Also, the dye wicked down the way unexpectedly in some places, and didn't take up in others. So we have green, blue, teal, etc versions of grey, with sparkles of the original white left to shine through. I not sure it was what exactly she had in mind, but I love it! (I'll be writing her in just a bit here to get her opinion.) I'm crossing this wrap with black weft, to leave the colors intact. I should have enough yarn on the loom for a second wrap. I'm thinking of a teal weft for that one, to pop out the unexpected gift of color. 

And now, back to the loom.

Thursday, September 26, 2013

Baby Wrap: color design

I've had a request to weave a baby wrap, so it is time to work on a new project! I had the recipient choose four colors of 10/2 cotton yarn from Webs. (http://www.yarn.com/index.cfm/fuseaction/product.detail/categoryID/3D03DC12-64EF-4CFA-BA1E-65F9D62C685D/productID/CD455D1D-4394-4515-B549-064F2A93BEA9/) She chose Lizard Green, Mosstone, Nautical Blue, and Burnt Sienna. The yarn got here today.

And now, time to decide on the color order. She'd like the colors to gradually fade one into the other as they go across the warp, with none of the colors repeating. The two sides of the warp will end up different colors, which evidently makes it easier to use the baby wrap without twisting the fabric as you put it on.

So, I took pictures of the cones of yarn in different orders:

Here are the two greens separated, one with the Burnt Sienna on the end, and one with the Nautical Blue on the end.


Here are the two greens separated, appearing on the ends with the other two colors in the middle.

Here are the two greens in the middle of the wrap.


And here are the two greens to one side, one with blue on the other end, and one with burnt sienna on the other end.


Now, the two greens are much closer in tone than I expected, given the picture on the yarn company's web site. So I rummaged around my stash of matching yarn, and came up with a couple of other options to offer.

I have a lighter blue to swap out for one of the greens. There should be enough left on there from the previous project for a good warp stripe.


Another option is a light brown.


And, just to make it interesting, here's what happens if I swap out one of the greens and the nautical blue.

I actually think that last one is my favorite of the bunch, with the colors in just that order.


So, what do you think?

EDIT: Oooh...I had limited myself to 4 colors, for cost purposes. But, I do have these other colors available. So, what do you think about all 6 thrown in there, like this?

Sunday, September 15, 2013

The Autumn colored warp-painted ruanas

I have a batch of fall themed warp-painted and hand woven cotton ruanas finally done!


Earlier this summer, I went on a week long camping trip with my historical recreation group. We were up in the mountains of Arizona, among the high pine trees. I brought my floor loom along with me, with a batch of yarn that I had already dyed up the previous week. I spent much of that week sitting in the shade, gazing at the distant mountains, weaving away. It was gorgeous!!


The first picture there is the view from my spot at the loom. My husband is there, working on a hand built bench. He started with going and harvesting a downed log from the forest, and ended up with a lovely sitting bench. We had fun working side by side on our various projects that week.

The second picture is the work on the loom, where I was switching warp colors. I had enough thread on the loom for three different garments. I used a different warp color for each garment, so the finished pieces are truly one of a kind. It is fascinating to see the difference that just changing the color of one element can make.

Anyway, I finished up the fabric, packed up, brought it all home, wet finished it...and then got totally sidetracked by other events in my life. (A new partner moved in with us, and life got crazy wonderful. And both of my kids got ready for and then left for college. Also a strange but good transition.) So, it wasn't until this past little while that I drug out the fabric and got to cutting and sewing.

But I have in fact finished up all of the garments. And today I took the three Autumn themed ruanas, as well as the two previous blue and maroon ruanas, and headed out to the White Tank Moutains with my husband for a photo shoot. And then, I spent this evening editing the shots, and getting the listings up in the Etsy shop.


 https://www.etsy.com/listing/162831599/hand-woven-and-hand-dyed-cotton-ruana?ref=shop_home_active


https://www.etsy.com/listing/162820012/hand-woven-and-hand-dyed-cotton-ruana?ref=listing-shop-header-3

https://www.etsy.com/listing/162832705/hand-woven-and-hand-dyed-cotton-ruana?ref=listing-shop-header-2


https://www.etsy.com/listing/162833047/hand-woven-and-hand-dyed-cotton-ruana?ref=listing-shop-header-1


https://www.etsy.com/listing/162833499/hand-woven-and-hand-dyed-cotton-ruana?ref=listing-shop-header-0


I am super pleased with how these turned out! I've got enough yarn and dye for another set of three. Next up? Greens!

Friday, August 23, 2013

Back again after a summer break, and some project brainstorming

Yes, I know. I haven't posted anything here since last May. Good grief, where did the summer go? Well, I was in Texas, and San Diego, CA, and up camping outside of Alpine, AZ, and took several trips to Flagstaff, AZ, and...and... This summer was the last one before both of my kids left for college and I hit the whole 'empty nest' thing. I took the time to pack the summer with family things instead of crafting things. And, I added a new relationship in there as well, so I've been decidedly distracted with the whole New Relationship Energy thing going on. (My life rocks. Seriously.)

But, the kids are off at school now. The semester has started, so my life drawing modeling is kicking back into gear. My loves are busy at their own works and school endeavors. So, this is my obligatory, "I'm back!" post indicating that I intend to get back into the studio and back at the keyboard.

So...what is up next project wise for me?

Time to brainstorm...

I have the materials on hand for another batch of 3 warp painted, hand woven ruanas. This warp will be done in greens, and blue greens.

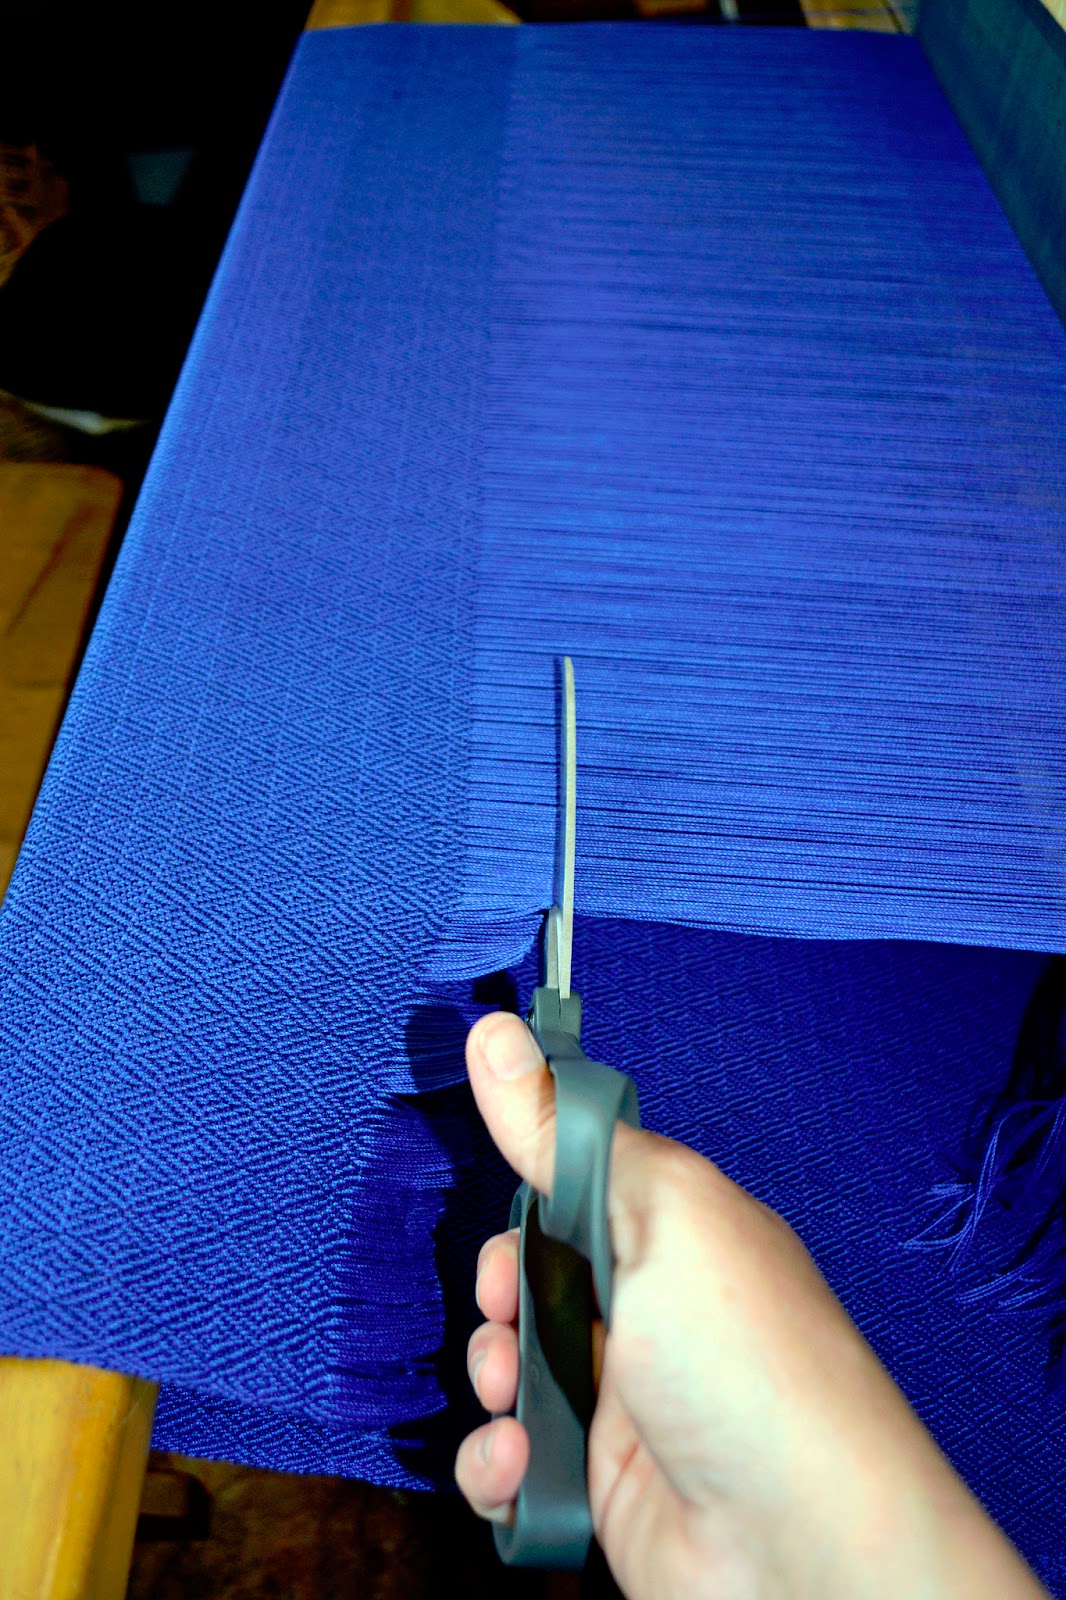
I still want to weave some cotton dress fabric for myself, for the historical recreation hobby I'm part of. The batch I did for Their Aten Majesties went over very well, and was a good proof of concept with this particular yarn. Now I have a more intricate twill pattern that I want to try, in blue and green yarn.

I need to do a batch or three of hand dyed silk scarves, to re-fill the Etsy shop. I also owe a scarf to a friend of mine, to complete a trade.

I got a Good Deal on some wool blend fabric that will work well for SCA garb. In fact, it was such a good deal that I picked up 40 yards of it, which should be enough to outfit the whole family. I've got some serious sewing ahead of me.

I've still got bunches of sock yarn that needs to be cranked into socks on my antique circular sock knitting machine. The leftover bits of sock yarn then go to my mother, to be knitted into baby caps for charity. (My mother rocks.)

I have a couple of almost done Viking wire woven necklaces, that just need me to fabricate the clasps.
And I've got another necklace already started, in copper craft wire with a black coating. The coating chips off pretty easily, which I'm going to turn into a feature by sanding down the outside of the finished chain. That way the outside will glint copper, and the inside of the weaving will stay black, for a two tone necklace. Should be interesting.

I picked up a batch of silk fan blanks last year, that are calling for some experimentation in silk painting techniques.

I've got an idea for another extended historical recreation project. This time I want to spin a batch of wool singles. In fact, I've already picked up 5 pounds of wool roving for just this purpose. And then, I want to play with the natural dyes that would have been available in Medieval times, and weave a color gamp. In other words, I want to warp the loom with stripes of different colors, and then weave the same colors in stripes going across them to make lots of different colored squares. That would show not only the range of colors available in history, but what those colors looked like when combined into cloth.

I have one more of the already woven ruanas to sew up into a garment. Then, I need to take pictures and get the 5 finished garments up in the Etsy shop. Fall is coming, and folks will be looking for wraps. Also, Christmas is coming and I need to stock the shop.


Huh. I think I have quite enough to get me started!! Now, where to begin?

Thursday, May 30, 2013

SCA Handwoven White Scarves: Finished Project!


They're done! The five hand woven SCA style white scarves are off the loom. I took a bit of extra attention to detail, and hand stitched the rolled hem with the same thread I used to weave the fabric. That makes the stitching just about invisible.

And here are the results. I'm really pleased with the way these turned out. The color and feel is crisp and clean. Since they are 100% cotton, they'll stand up to the wear and tear of the rapier fighting field, and still be machine washable. Also, I got quicker at weaving these than the last batch I did, so I was able to lower the price on them when I listed them in the Etsy shop. One of the longer ones is already sold, and left today for its trip to its new home in Pennsylvania. I'm so tickled! Here they are:

https://www.etsy.com/listing/152468130/hand-woven-sca-white-scarf


Sold!

https://www.etsy.com/listing/152473962/hand-woven-sca-white-scarf-long

https://www.etsy.com/listing/152558166/hand-woven-sca-white-scarf-long


https://www.etsy.com/listing/152562758/hand-woven-sca-white-scarf

I also re-listed the two left over from my previous batch of scarves, so there is a nice half dozen to choose from in the shop right now. Though, I have two folks making noises about needing to acquire them, so they may not last too long.

Now, on to the next weaving project: warp painted ruanas in brown, rust, and cream. Ready? Go!

Tuesday, May 14, 2013

SCA White Scarf Project: The Weaving has Started

More progress on the white scarf project! Yesterday I wound up the bobbins...


...and started weaving! Since I'm doing 6 different scarves on this warp, I needed a way to measure how long the scarf was as I was weaving it. I measured a guide string the length of one scarf, and pinned it in place at the beginning of the weaving with a T-pin. Then I let the guide string wrap up along with the finished fabric. When I reach the end of the string, I know it is time to start the next pattern.


At the end of one scarf, I put a couple of picks of contrasting color and change my treadling. It is fascinating how just changing the order that I step on the treadles can make very different looking patterns.


And just for the record, I love working in my studio in the late afternoon, when the light comes streaming through my windows. It is like weaving sunbeams.


The first scarf is finished, and I'm part way through the second. (Just keep weaving....just keep weaving....What do we do? We weave, weave, weave!)

Monday, May 13, 2013

SCA White Scarf project: Warping the loom pt. 2

In between doing Mother's Day things today, I managed to finish getting the loom all warped up. The first step in today's tasks was to tie the warp onto the back apron rod, and then crank the warp round and around the back beam. This stores the yarn until I can get around to weaving it a bit at a time. I love the way the mass of threads looks there, all sleek and clean and organized.


Then I went around to the front, and tied the other end of the yarn onto the front apron rod. Now the threads go from the front apron rod, through the reed, through the heddles, over and around onto the warp beam. (This picture is taken from the back again, but you can see how the threads look now that they're finally under tension.)


Back around at the front, I used some yarn left over on the shuttle from the previous project, and wove an inch or so. This header had the effect of spreading out the warp from where it was bunched up in the knots.


There was one last task to do. I had to crawl underneath the loom for this one. Remember that the threads go through heddles that control when they rise up in the weaving process? Each of those heddles is grouped on one of four harnesses. I can connect those harnesses to foot treadles, by way of chains. When I step on the treadle, the connected harnesses will rise up, lifting their associated threads. Each treadle can connect to one, two, three, or all four harnesses. Which harnesses the treadles are connected to, and which order I step on the treadles, that will define what pattern I will get on the scarves. With only changing the tie up of the treadles and the order that I step on them, I should be able to get several different patterns. My goal is to have each scarf have a unique pattern, without having to do more than changing those two variables.

All set to go! Tomorrow I wind some bobbins, and get to weaving. It should be fun to play with the different patterns, and see what I get. On your marks...get set.....

Sunday, May 12, 2013

SCA White Scarf project: warping the loom pt.1

I spent a quiet afternoon in my studio today, making progress on the woven White Scarf project. For those who missed it, in my historical recreation group, folks who are Very Very Good at rapier fighting are allowed to wear a white scarf on their shoulder. I got a commission for a hand woven one, and am taking this opportunity to make a half a dozen of them. I did the math and planning part of the project last night, which means today I got to start to play with the string. First up, I had to measure out 124 threads, all 8 yards long, in a way that wasn't going to get them tangled up. To accomplish this, I have a warping mill. I wind around and around it, back and forth, following a guide string that is just the right length.

When I take the thread off of the warping mill, I chain it up so that the threads stay under control and won't tangle. Then I wrap the warp chain around the front breast beam of the loom to keep it in place during the next part.

Next up is sleying each thread through the reed of the loom. The reed spaces the threads out to the proper width. When I was winding the threads on my warping mill, at one end I did a figure 8 maneuver around a couple of pegs, to give me something called the warping cross. When I sley the reed, I transfer that cross to the hand that is holding the thread. Then I pick the threads one by one from the top of that X to go through the reed. Since they are in that X, I can pick them off in the exact order that I wound them around the warping mill. It is another trick to make sure that the threads don't become a tangled mess.

After I've sleyed the reed, each individual thread gets put through its own heddle. The heddles control when each thread rises up in the weaving process.

So, you can see the warp around the breast beam, going through the reed, and then through the heddles.

The next step will be to pull the warp through and wind it around the back beam. But I'm out of time today, so that part of the process will have to wait. More pictures later!

Saturday, May 11, 2013

New Weaving Project: SCA White Scarf


See that? That is how a weaving project starts for me. I got a commission today for a hand woven White Scarf. In some parts of the SCA (the Medieval/Renaissance historical recreation group I'm part of), a white scarf worn on the shoulder or tied onto the arm designates someone who is Very Very Good at rapier fighting. Several of the folks around my Kingdom wear scarves that I've hand woven, but I am about out of my stock. And, the gentleman who contacted me wants one that is longer than the two that I have left.

So, tonight after I got back from my son's final choir concert for the year, I rummaged through my yarn stash and started looking through pattern books for inspiration. I chose two different 10/2 cotton threads, in whites that are just a little bit off from each other. That way the scarf will be pure white, but the pattern will pop just a little bit more than if I wove it all of the same white. Making it of cotton ensures that the scarf will be machine washable. That is an important consideration, since these tend to be worn on the fighting field. Inevitably, they will get dirty. Very dirty in some cases. Sword fighters are not known for being easy on their fighting garb!

I weighed the yarn to see how much I had available, so I knew how many scarves I could make this time around. I did the math, and decided to make three scarves that should be long enough to tie around the arm, and three that are short enough to pin over the shoulder without getting in the way of arm motion. I knew I wanted to do a twill variation of some sort, so I looked up the chart for yarn settings and decided to put 30 warp threads for every inch. Out came the calculator, paper, and pen. I need...hmmm...120 threads, each of them 8 yards long. Wait...since it is a twill pattern, I find it easier to use some floating selvedges on each side. Make that 124 threads. Scribble, scribble, figure.

Then I went rummaging through my books. I like be able to set up the loom once, and make a variety of patterns depending on how I do the treadling. Ideally, each of the six scarves would have a different pattern, without me having to re-do my set-up on the loom. I found what I was looking for in the old standard, "A Handweavers Pattern Book" by Marguerite Davidson. I'll be playing with one of the variations of Rose Path twill (#2), found on page 17. In the picture, it is the second column in from the right.

Ok, I think my initial calculations are done. Tomorrow I start measuring thread!


Wednesday, May 8, 2013

The final steps of the diamond twill weaving project

Ah ha! Blogger was being a little persnickety about letting me upload pictures to show you all. Now that I seem to have that issue fixed, let me give you a peek at the wrap up of the diamond twill weaving project.

Cutting the fabric off of the loom is always a bit nerve wracking, while still being a joyous celebration that the weaving is finally done. Take a deep breath, and....

And then, this part is even more nerve wracking. You never really know what your finished fabric is going to be until you wet finish it. That first washing lets the threads slide into their finished places, and the fibers bloom and soften. And shrink. In this case, the fabric was 32" wide and 12 yards 20" long coming off of the loom. I sewed the ends so they wouldn't fray, then tossed the whole kit and caboodle into the washing machine on hot, with high agitation. After a trip through the dryer (also on hot), the finished fabric was 30" wide, and 11 yards 22" long. And the fabric had softened beautifully to the touch. I was so pleased with it!!


Of course, brand new fabric is fair game for the Studio Cat. We had a discussion as to whose project it really was. She was not pleased with me when I pointed out that I was the one with opposable thumbs, as well as the one who provided the cat food.


But, here is a shot of the finished fabric. Is it not gorgeous?


I'm really pleased with the way this project turned out, and will be making more yardage out of this yarn now that I have proof of concept. This fabric though? I can tell you now that this project was inspired when some friends of mine won Crown Tournament in the historical recreation group we're part of. They are both fiber geeks as well, with spinning and trim weaving skills that I think are better than mine. Of all the people I know who have taken on the burden of being in charge of the batch of...er...'strong personalities' that make up this hobby of ours, they would be the ones to most appreciate a gift of handwoven fabric to make costumes out of. I chose the light weight cotton since they're ruling in the summer in the deserts of Arizona, the blue to match the heraldry for the kingdom, and the medieval pattern to match some historical fabric remnants.

And how did they like it?


I got a Royal Squee!

Mission Accomplished.

(Last photo by Scott Whitaker.)