Monday, December 28, 2009

Tutorial: Changing colors on a tri-loom

I'm working on the tri-loom today, making a shawl in neutral colors for Shane's Granny. It was supposed to be done for Christmas, but well, I kind of ran out of time. So it will be a New Year's present.

In any case, it occurred to me that when I first started with the tri-loom, I had to look up how to change colors. So I snapped some shots just a bit ago. Here's how I do it:


First off, I plan out my color changes ahead of time, so I get an even plaid when I am done. I mark the pegs where the changes will take place by putting a paper clip on them. If you have smaller pegs, a rubber band or a piece of string may be a better choice. But in my case, the paper clips have stayed in place through several shawls.

So, when you come to a paper clip, stop weaving for a moment and get out your next color of yarn.


Now, let your current color of yarn dangle down. Cut the yarn so you have a long tail. If you are going to fringe your shawl, make sure the tail is long enough to hide in the fringe. If you are not going to fringe your shawl, make sure the tail is long enough to weave back in later.

If you're using Lion Brand Homespun, like I am with this project, tie knots in the cut ends of your yarn right now. This yarn is lovely, but it frays like nobody's business if you don't control it with a knot!


Grab your new color of yarn. Let a tail hang down in this color too, and pinch the two yarns together right at the bottom peg.


Tie a loose knot at this spot.


Tighten the knot, so it snugs into place right where the yarn will bend around the bottom peg.


Ok, now you can go back up and continue weaving as normal. Your old color will weave down to the knot, and your new color will continue across to the other side. The tails will hang down below the loom, and will be hidden in the fringe or woven in at the end before you take your shawl off the loom. It feels odd to have the color change take place there, but trust me, it will work out symmetrically in the weave.


I'll post pictures of the finished shawl in a day or so, when I get it done. I think it will have a nicely elegant feel to it.

Saturday, December 26, 2009

Misc gifts I gave for Christmas


I made quite a few gifts to give this Christmas. Some of them I can't post pictures of yet, because they haven't gotten to their intended recipient quite yet. But here are a few of them.

My daughter has been coveting the tri-loom shawls I make, so I gave her this one. It was done awhile ago (that is her modeling it for me, actually), but was the colors she wanted. So it just had to go to her.


My sweetie's sister likes pink. Really really likes pink. So I made this cotton candy confection for her. It is soft and snuggly, and quite quite...well, pink.


My husband has been gently hinting that it might be his turn to get hand made wool socks. This is some of the yarn that I dyed up awhile ago. It was inspired by candy canes, but it also happens to be in his SCA heraldic colors. He wore them around the house all yesterday, and was very pleased.


My sweetie picked out this sock yarn for his mother, and I made it up into a nice snuggly pair of socks for her. It is a wool/nylon/bamboo blend, which is lovely to the touch. The colors reminded him of one of the first vehicles she had. I even got the stripes to match up pretty well on this set!


There are more pictures to come, in a day or so. Stay tuned!

Thursday, December 24, 2009

Merry Christmas! (and a cookie recipe)

Merry Christmas, to everyone who celebrates the season!

And as my gift to you, here's an old family recipe for Ginger Cookies. These are from my mother's mother's father's mother, Clarissa Peruna Hall Wiest-Burke. She lived in Indiana, USA, in the mid 1800's. I remember having great fun making and decorating these cookies as a girl. Hmm...I wonder if we can whip up a batch tomorrow afternoon?


Ginger Cookies

1 cup sugar
1 cup shortening
1 cup golden molasses
2 eggs
1 tsp allspice
2 tsp ginger
3 tsp cinnamon
3 tsp soda dissolved in 1/4 cup boiling water
about 5 cups flour

Cream together the sugar and the shortening. Blend in the molasses and the eggs. Stir in the allspice, ginger, cinnamon, and soda. Blend in enough flour to make a workable soft dough--about 4-5 cups. Chill dough. Roll out on a floured surface, about 1/4" thick. Cut into shapes. Bake on greased cookie sheets in a 350 F oven for about 6-7 minutes.

We used cookie cutters, and cut these into trees and gingerbread men and other fun shapes. Then we decorated them with colored icing.

Enjoy!

Wednesday, December 23, 2009

The right tool for the job


This is so slick!

Several weeks ago, if you recall, I spent some time hand dyeing a batch of wool sock yarn. Today I had a break in making Christmas presents, and took the opportunity to ball up the yarn. I find it much easier to work from a center pull ball of yarn, rather than from a skein.

Now, traditionally this would mean having someone stick their hands out and hold the yarn for me, while I methodically wound the yarn into a nice neat ball shape. But I have a love for fiber gadgets, and had just the right tools for the job! On the left is an umbrella swift. It expands to hold the circle of yarn, and spins freely around. On the right in the picture is a Boye automatic ball winder that I picked up from Joanne fabric and craft store a month or so ago.

I ran the yarn from the swift to the ball winder, turned it on, and started turning the swift by hand. After the first several turns around however, the combination got up enough momentum that I could go hands off, and just sit back and watch. All I had to do was deal with the very occasional tangle in the skein, and then slow the ball winder down and turn it off when the end of the yarn finally got around.

My kids walked in on me when I had it all working correctly. They thought it was cheating, and teased me about how hard my work was. Ah, the joys of a well equipped studio! I love my gadgets.

Wednesday, December 16, 2009

Learning to use the dobby loom...sort of

I've been trying to get my new-to-me dobby loom warped up for the first time. It is an older AVL 12 harness loom, with a mechanical dobby set up. And I think today I have made just about every mistake in the book.

Over the past few days, I managed to get the warp on the back beam, and threaded the heddles. Today I sleyed the reed, tied on the front beam, and started teaching myself how to peg a dobby pattern. Instead of lifting the various harnesses via foot treadles, the dobby loom has a mechanism that lets you pre-set your pattern through a series of bars and pegs. First thing I had to do was make a pegging pattern.

I'm using a fancy point twill pattern in the threading, and figured I could just tromp as writ for the weft. I figured and figured, and came up with something that I thought might work. Then I started pegging the dobby bars.


I got the whole thing done, and tried to install the chain onto the loom. Um...and tried again. And again. And then figured out that I had put every one of those pegs on the wrong side of the bars. See? I put them coming out of the narrow side of the bars. Wrong. They were supposed to come out of the wide side.


So I took all the pegs out, and screwed them back in on the correct side this time. After that, the chain went in to the loom, slick as a whistle.


Ah ha! I fiddled with the tension of the warp (that is going to take some figuring out still), and started weaving. It worked! Um....sort of. Something wasn't right. After about an inch, I figured out that I had installed the dobby chain upside down. So I took it out, flipped it around, and tried again. Much better.

Now I wove an inch or so...and found that there were warp threads that floated over more than 7 weft threads. For a serviceable cloth, those floats are way too long. They'd snag. I went back to my pegging pattern, and looked for where the trouble spots were. Then the dobby chain came back off again, and I changed the pegging in those spots. Back on the loom, and try again. Now I had weft floats that were too long. One more time back to the graph paper, another change in pegging, and I had the pattern pretty well close.

Except...I was getting elongated rectangles when I had been aiming for a square pattern. Even when I got the tension mostly cranked up, it was still elongated. Which meant that I had the warp crammed too close together.

I looked at it...and looked at it...and took a scissors to my warp. Back to figuring out my math. Now I'm in the process of re-sleying the warp into a different reed, spreading it out a bit more.

Crossing my fingers that it will work this time. At least I have a better idea of what I'm doing this time around. But it was heartbreaking to cut away hours of work!

Maybe tomorrow will go smoother. I hope. It can't be much worse than today...can it??

Thursday, December 10, 2009

Yet another learning experience

Tip to the wise: When you are weaving, be sure to check how much yarn you have on hand. Actually weigh it, and check the yards per pound of that size yarn. How much do you have? Now, calculate out how many yards worth you will actually need. Is there enough?

Oops.

Ok, can you get more of that particular yarn in time?

No? Ummm...

I wonder how this project will look with some green stripes in there...?

Saturday, December 5, 2009

Sewing binge: new Cotehardie

I took my kids to the local fabric heaven last Wednesday, so my daughter's friends could find some material for kilts. For you in the Phoenix, AZ area, that would be SAS Fabrics By the Pound. We went to the one on 19th Ave. If you sew at all, it is worth the trip over to wander around the store.

I wasn't going in to purchase anything for me, mind you. Just playing chauffeur for the kids. Silly me. I do historical recreation, and several events are coming up in the next few months.

I found some maroon cotton for $2/yd, that would make a great under tunic for an outfit I already had planned out. It matched the trim I already had. Snag.

I found 20 yards of a muted green linen, at $3/yd. That is enough to make matching tunics and shirts for the whole family. Had to take that too.

And then I found the cotton moleskin fabric, which is not necessarily accurate to period but feels soooooooo pettably soft to the touch. And it drapes beautifully. They had 5 yards of a dark olive green. And then I found another 4 yards of taupe. And they went beautifully together.


And well, our local group's Solstice event was coming up this weekend. The dress popped into my head, full formed. I could see a cotehardie, the height of fashion from the 1300's, with buttons down the front. Long sleeves, form fitting through the torso, then flaring at the hips to a full floor-length skirt. Maybe just off the shoulders, in the French style of the time. And though there wasn't enough of the dark green to make the whole dress, I have run across a couple of pictures that showed a contrasting fabric in the gores of the skirt.

At $3/yd, I couldn't resist. So I took it home, and ran it through the wash while I finished up another project so I could clear room in my studio. Friday morning, I was ready to start work. I spent the day tweaking patterns, cutting fabric, swearing, and sewing.


It took me until about 4 am, but I finally got the last button sewn on. I collapsed into a heap of sleep. This morning, my husband helped me with the final fitting and alterations, and we finished up just in time to make the event. Got lots of compliments on the outfit!


My husband snapped this shot for me after we got home. I'm leaning against my antique loom, which my family has decorated for the season. (They figured I was too caught up in Christmas prep, and I wouldn't be weaving on it until the decorations were put away. You should have heard them giggling!!)

The planning stages of sewing? Lots of fun. Actually sewing is a chore for me, and I rush through it as fast as I can while the inspiration is still spurring me on. But having sewn, and then slinking around in my new dress? Priceless!

Thursday, December 3, 2009

Nothing to see...move along...

I'm kind of conflicted just now. I want to burble away about the projects I'm making, as usual. Lots of pictures, tutorials when I can break things down into simple steps...but most of what I'll be making in the next few weeks is slated for Christmas presents. And I happen to know that my family members poke their noses in here now and again.

So...hmmm. As I'm doing things that are not present related, they'll go in here. In the meantime, I'll be stockpiling pictures for one great big "Look what I did!" post come December 26th.

Sunday, November 29, 2009

Inkle Pattern: Christmas book marks

I was headed out to SCA practice today, and realized I didn't have a good project to take along with me. So I grabbed the inkle loom and some cotton crochet thread, and spent the afternoon chatting and warping up the loom. I decided that some simple bookmarks in Christmas colors might be fun for the day.


Handsome, aren't they? I encourage you to make your own! Here's the warping pattern I used:

G G G W W G G G W W R R R R R R R R R W W G G G W W G G G
G G G W W G G G W W W W W R R W W W W W G G G W W G G G

G: green
W: white
R: red

Read from left to right, starting with the top 'G' and alternating between the top and the bottom rows. The top line are the yarns that are threaded above the first post, and the bottom line are the yarns that are threaded below the first post. Make each bookmark about 7" long. Cut a couple of lengths of cardboard to weave in between bookmarks, like you see in the picture. That leaves room for fringe on each end.

Have fun with them. These would make great stocking stuffers, or little gifts for co-workers.

Wednesday, November 25, 2009

Quote for the Day

From my mom's knitting calendar:

"Many, many cultures around the world have ceremonies and rituals that center around the washing of the feet. It is humbling to care for the most functional, low, and work-bearing of a person's parts. To tend to someone's feet speaks of an understanding of the journey they are on. It's just one of the reasons I've always thought that knitting socks was really noble."

Tuesday, November 24, 2009

Tutorial: Ribbed Selvedge Edge on the Circular Sock Machine

I've been working with the ribber on my circular sock machine today, trying to get it working properly. I was having some issues with dropped stitches, and with stitches binding up on the needles and not dropping at all. There were two issues in play.


First, on the inside of the main cylinder, there is a metal stopper screwed into the wall. The screw I had to hold this in place was too long, so the stopper wiggled back and forth. The head of the screw was also chewed up by the years. I went to the hardware store for a replacement, but the ones they with the right size thread were all too long. I took one home and sicced my guys on it. With the help of a bench grinder and a magic threading gizmo, they made me a screw that worked. Problem one solved.

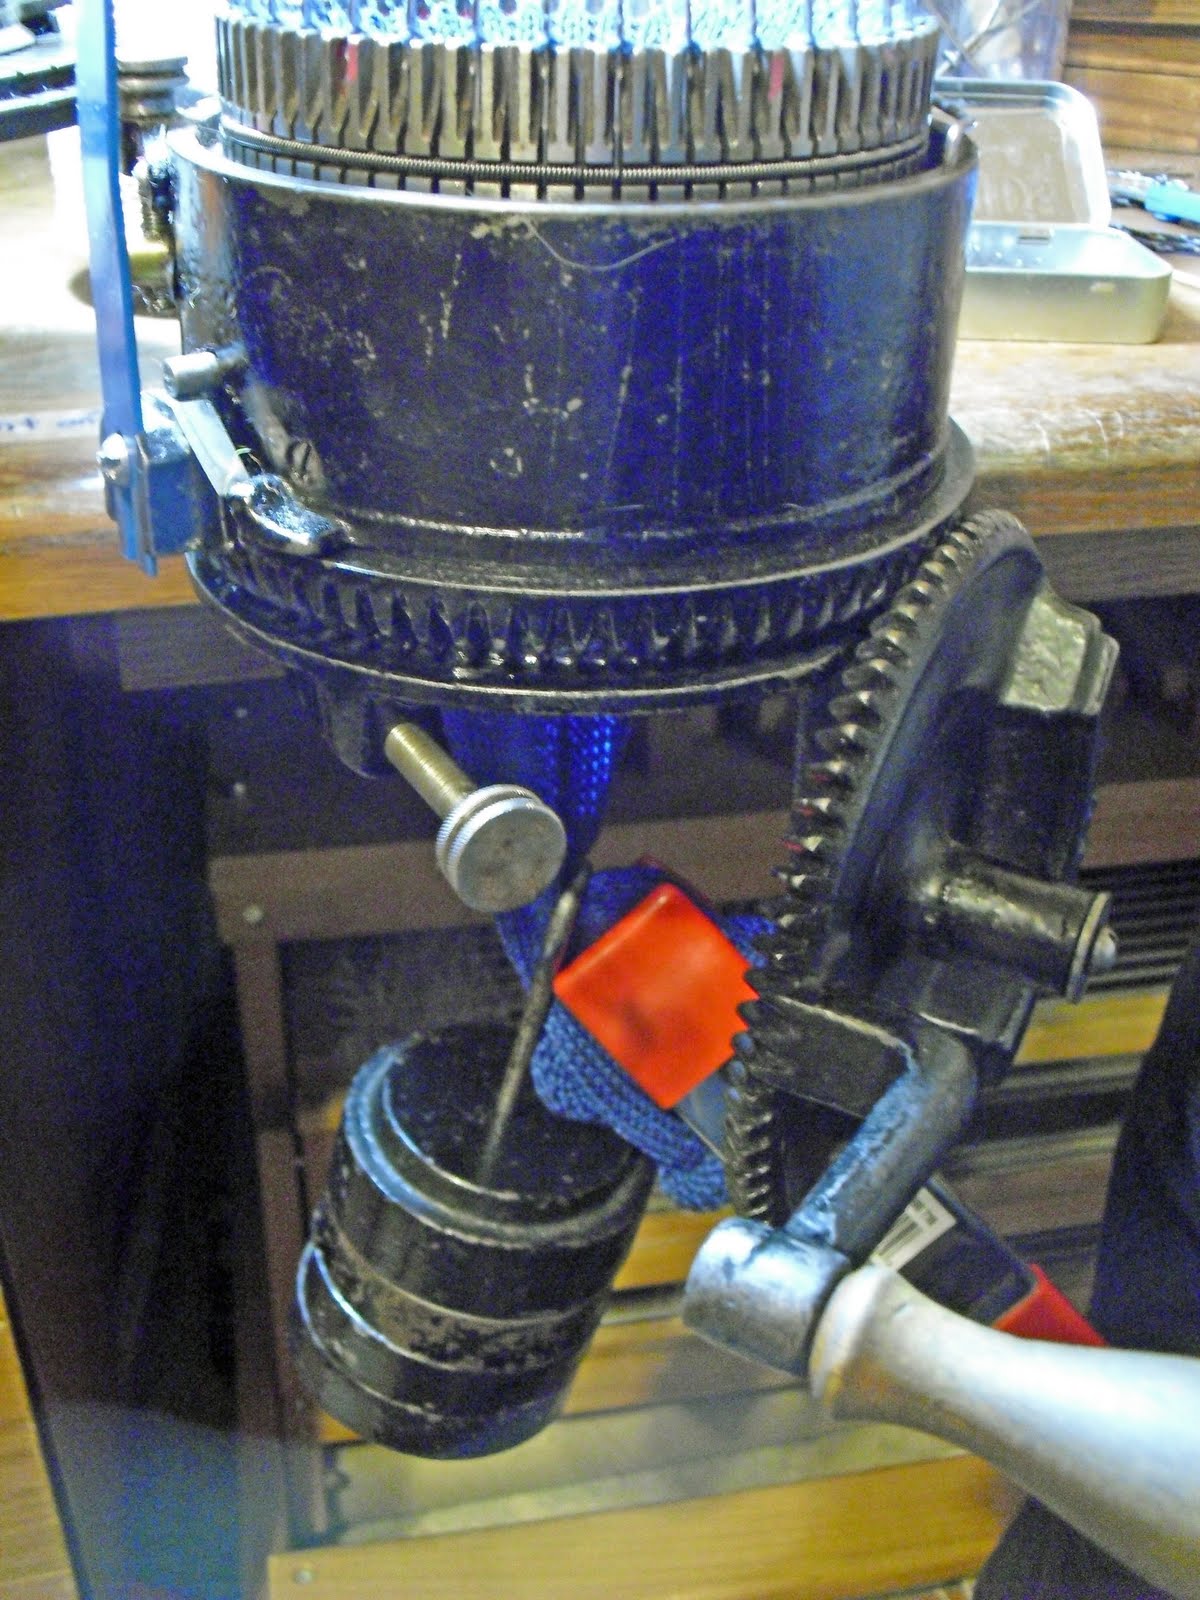
The second problem I was having had to do with the height adjustment on the ribber. I didn't realize the height adjusted, to start with. It actually can move up and down with the help of this screw. I found you need your ribber low enough that the yarn is catching and not being strained, but not so low that the stitches bind up when they slip down below. You especially need to leave room to slip by that metal stopper on the inside of the cylinder. Trial and error gave me the right height. Yay!


So, now that I had the ribber working, I hunted around until I found directions on how to make an edge that wouldn't ravel. Here's what I did:

First, I set up the machine with every other needle in place. Then I hung my set-up bonnet on the needles.


Some of the needles are down below, so I couldn't hang the bonnet on them. I started my waste yarn, and pulled down on the bonnet. Then I cranked forward until those needles were raised.


Now the needles were available, and I hung the rest of the bonnet.


After all the needles had stitches on them, I hung my weights on down below. I'm still missing the weight buckle that should have come with the machine originally. A clamp is working well so far, with the weights hung around the knitting just above the clamp.


With the weights in place, I cranked a couple of rows of waste yarn.


Now it was time to put the ribber in place. The pole slides down into openings on the side of the machine. I made sure it was settled all the way down as far as I have the screw set. Mine sometimes sticks half way down.


There are two moving plates on the ribber. Pull the bottom one counterclockwise, until the pin below comes to rest on that stopper in the cylinder. The top tappet plate rotates clockwise, until it comes to rest against the big pin comes down in from the top.


Now, I added my ribber needles, sliding them into the slots.


This screw down below moves the ribber by little bits. Adjust it until each ribber needle lines up with the opening left by a missing cylinder needle.


I made sure my ribber needles were in service, and cranked a couple of rows to make sure everything was adjusted correctly.


Then I cut the waste yarn...


...and replaced it with sock yarn.


After cranking half a round, I reached up with a little crochet hook, and pulled the tail ends of yarn down into the interior of the machine. Then I completed one row of knitting with the sock yarn, with the needles in service.


After completing the first row, I put the needles out of service, and knit two more rows.


After those two rows, I put the needles back in service. This maneuver makes the selvedge edge, that won't unravel. I only had a snippet of left over sock yarn for this trial, so I knit the rest of the yarn up. When I reached the end, I held the knitting down below while I cranked, so when it fell off the machine the weights wouldn't hit my feet.


Here's the ribbing, still attached to the waste yarn.


I snipped the waste yarn off, and was left with a neat and clean top.


I'm pleased with the problem solving and the learning I did today. Maybe tomorrow I can actually work on making a ribbed sock!

Saturday, November 21, 2009

Tutorial: Dyeing sock yarn

I was playing with the dyes today, coloring a batch of wool/acrylic sock yarn that I bought off of Ebay. I had some fiber reactive dye left over from last year this time, when I had made a series of warp painted cotton shawls, and I was hoping to use that. Of course, dyes for cellulose fibers don't always work on protein fibers. I spent the last couple of days pouring over my books and various web sites, and came up with a solution. It seems that you can use fiber reactive dyes on wool, if you substitute vinegar for the soda ash in the pre-soak phase, and heat set the dye. So, I decided to try it out. Here's what I did:

Ingredients:
wool/acrylic sock yarn
Dharma fiber reactive dye (from Dharma Trading Company)
water
Synthropol
white vinegar
urea

Tools (NOTE: do not use your dye tools for food prep ever again!)
buckets
measuring cups and spoons
plastic spoons
small tupperware tubs
saran wrap
plastic bags
newspaper
sponge brushes
steamer
drying rack
breathing mask
rubber gloves

First off, I put my yarn in a bucket and covered it with water. Then I put the lid on the bucket so the dogs wouldn't drink the nice wool soup, and went out to lunch. When I got back, I pulled the yarn out for a moment, and added 4 cups of white vinegar and about a 1/3 cup of Synthropol to the water, and put the yarn back in. The vinegar makes the water acidic, so the protein fiber will take the dye. If I was working on cellulose fibers, I would use soda ash instead at this step. The Synthropol helps the fibers take the dye.

While the yarn was soaking in the vinegar water, I cleared away the remnants of the Epic Nerf War from my working surface, and convinced the various cats that they didn't really want to help. Really.


I covered my working surface with plastic garbage bags, then a couple of layers of newspaper.


Next, I had to mix up the dyes. At this point, I put on my breathing mask and rubber gloves, for safety's sake. Then I made a batch of chemical water, using 2 quarts of warm water and 1 1/2 cups urea pellets.


I put a cup of the chemical water into a little tupperware tub, and added two teaspoons of dye powder. A layer of saran wrap went down onto the table, and the yarn went on top of that. I used the sponge brushes to directly paint color onto the yarn.


Then I folded in the edges of the saran wrap, sealing in the yarn, and rolled up my skein into a big funny looking cinnamon roll.


The rolls went into my steamer, and simmered for 1/2 hour. While the last one was simmering, I cleaned up my work station and then took off the breathing mask.


After the rolls had steamed, I put them out on the counter, still in their wrappings. They sat for several hours, until they were cool to the touch.


I unwrapped the bundles one at a time (gloves back on for this stage!). I filled the sink with cool water, and gently put the yarn in. The unused dye leached out into the water, at which point I would pick up the yarn, drain and refill the sink, and repeat. After three or four repeats, the water ran clear and all the unused dye was removed from the yarn.


The yarn is hung to dry.


The yarn seemed to take the dye quite well, actually. I am really looking forward to putting some of these skeins through the sock machine, to see what I come up with. But as it is, I'll call this dyeing experiment a success.