Showing posts with label yarn. Show all posts

Friday, February 9, 2018

Dyeing sock yarn, making flip-flop socks, eclipse pictures, and needle felting.


So, what have I been up to this past month? Playing in the dye pots! I'm really getting a kick out of creating variegated yarn by dyeing it in my crock pot. I love what is coming out of it so far.

I had a request for flip-flop socks, so I've been teaching myself how to do those on the sock knitting machine. They are a bit fiddly, but I'm getting the hang of it. I'm part of a circular sock knitting group on Facebook, and there were instructions for these in the files. So far, so good.


I had a great time getting these shots of the lunar eclipse. My husband Eric got up early, I stayed up late, and we made a drive out to our favorite spot in the White Tank Mountain regional park west of Phoenix to stalk the super blue blood moon. I'm quite pleased with the results.


And speaking of pleased with the results, I tried my hand at two dimensional needle felting, using some 8x10" wool prefelts for a base to work from. The first picture was me just doodling over the course of an evening, trying out layering different colors in an abstract piece to get a feel for the materials. The second was my attempt at fiber figure drawing, using just black and white wool felted over a medium grey piece of wool prefelt. I am loving the results!! I am definitely going to be pursuing this medium for my art. I dyed many of the colors in the top piece, by putting a length of white roving in with my sock yarn when I dye it. So, this combines my dyeing, my felting, my drawing, and hopefully in the future my photography. I'd like to take pictures, and use them as reference photos for my fiber painting.

I am really really excited by the possibilities here!


Friday, December 8, 2017

Tutorial: Self striping sock yarn

Now, I am not an expert. But I hand dyed some self striping sock yarn, and I'm really pleased with how it turned out!


So, I figured I'd share what I did with you all.

Materials:
Wool yarn. I used superwash sock yarn, which is less likely to felt.
Jacquard acid dyes
vinegar
water
cotton crochet thread for ties
Dawn dish soap for washing afterwards

Tools:
saran wrap
squirt bottles
measuring spoon
gloves
dust mask
warping mill (or something to measure out your yarn)
swift (Or someone to hold the hank of yarn out for you in their hands.)
ball winder (Optional. You can ball up the yarn by hand.)
scissors
steamer
tub for soaking

Note: Do not use any of the items used for dyeing for food preparation ever again.

So, the first thing I did was to wind the hank of yarn from the swift onto my warping mill. I figured that 5 yards on the mill would give me about a 10 yard repeat (as the yarn goes back and forth from end to end.) My calculations were that that length would give me about an inch pattern repeat in my socks. You'll have to swatch for your own tension and row size to get your own figures.
 I tied loose figure 8 ties every yard, from some cotton crochet thread. That helps keep things from tangling, and the cotton doesn't dye so I can find it easily later on. Don't tie these too tight, or they will block the dye from getting through to the yarn.
 I also used loose ties around each arm of the figure 8 crosses at the ends of the warping mill. This again keeps things in order, and makes it easier to replace the yarn back onto the mill when the dyeing process is done.
 Then I chained the yarn up as I took it off the warping mill. No tangles!
 I soaked the chained up yarn in a tub of water and vinegar for half an hour. I had about a cup of vinegar in here. This provides the acid for the acid dyes to bond to the fiber.
 While the yarn was soaking, I put down a layer of cling wrap onto my work surface.
 Then, I chose my colors. My client wanted green, yellow, orange, and pink, as bright as possible.
 At this point, I put on my dust mask and gloves. Then I put about a half tsp of dye into each squirt bottle, and mixed it with warm water. Once the dye powders were closed up and put back away, and my area cleaned up, I could take the dust mask back off. I don't want airborne particles in my lungs!!
 I squeezed the water gently out of my yarn, and laid it out onto my work surface.
 Then, I had fun with the squeeze bottles! I used my gloved fingers to squish the dye down into the yarn, to make sure it got all of the way through. A bit of color theory helped here. I wanted bright colors, and I know that colors across the color wheel from each other combine to make earth tones. So, I kept the green and pink/orange far away from each other.
 After dyeing, I covered everything with another layer of saran wrap.
 Then, I rolled the bundle up.
 I curled the long bundle around itself, and put it in my steamer. I steamed the packet of yarn for an hour, then let it cool overnight. The next morning, I rinsed the yarn in the sink with first a squirt of dish soap, and then plain water to rinse the soap out. You are looking to rinse until the water runs clear. It didn't take long at all this time. Then, I hung the yarn up to air dry. (I forgot to take pictures of the rinsing and drying process.)
Once the yarn was dry, I put it back onto the warping mill, and used my automatic ball winder to put the yarn into a useable form.
 All ready to go!
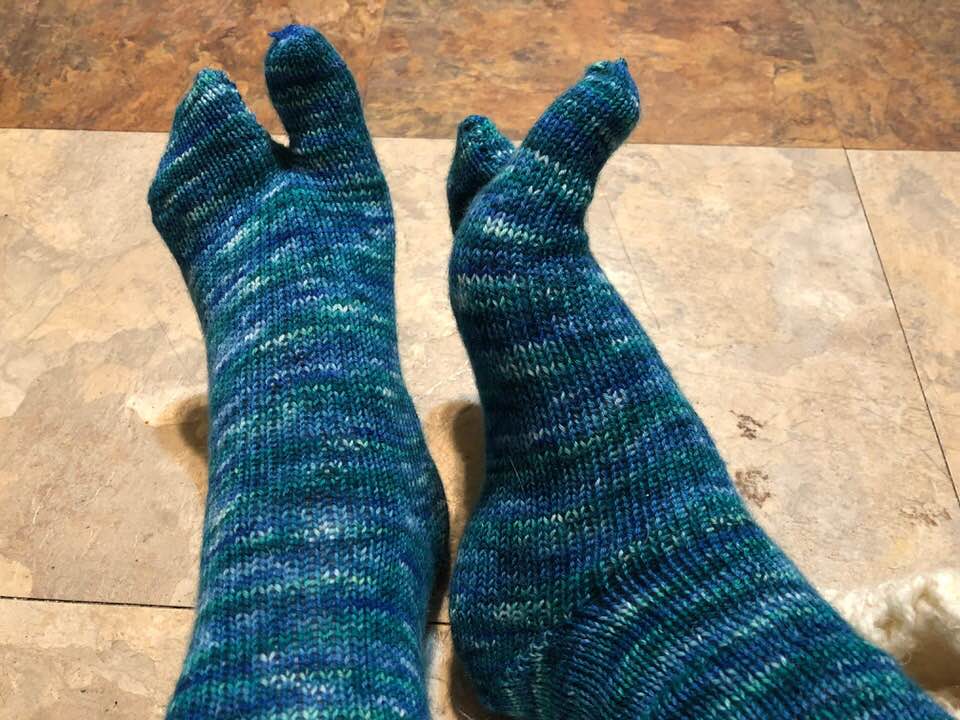
It worked!!! I cranked out a pair of socks on my 100 year old sock knitting machine, and just danced in my seat the whole time. I am really, really pleased with how it turned out!

Wednesday, November 1, 2017

Yarn review: Franklin sock yarn

Well, that didn't work as well as I hoped. I was experimenting with Franklin sock yarn from Webs. It dyed up beautifully! But it is a little thick for my antique knitting machine. And, when I got a sock made up, it felt kind of dry and crunchy to the touch. I think this sock yarn is a little coarse for my sock making needs.

Come to think of it though, I think this yarn will be beautiful for making coiled basketry, where the feel against the skin won't matter as much. It seems nice and sturdy, and should hold up nicely for that use. (This picture is from a different brand of yarn, but you get the idea.)


Yup. Need to keep experimenting!

Wednesday, January 4, 2017

Lion brand Homespun 'Thick and Quick' on the triloom follow up


I finished up the triloom shawl tonight, and I love love LOVE the way it turned out. I have finally found the PERFECT yarn for my triloom. Before, I was using yarn that was either too thin, and the weave ended up 'sleazy' (holy and unstable, kind of like cheesecloth), or too thick and the resulting shawl didn't drape well. But this is just right. I took it off the loom and tried it on, and it was like wrapping up in your favorite cuddle blanket. I had my husband try it on, and he said it was like wearing a hug. Soft, and thick, and warm, and I am sooo making more of these for the Etsy shop because I want everyone to have one!

Yes, I like it. :)

Tuesday, January 3, 2017

Lion brand Homespun yarn on the triloom for shawls


I saw today that Joanns had the sock yarn I prefer on sale, so I popped over to stock up. While I was there, I found a new-to-me yarn that looked like it would be perfect for my triloom shawl making. This is Lion brand Homespun, but in a 'thick and quick' size that is bulkier than the stuff I've used before. So I grabbed a few skeins to try out.

It is working up beautifully!!! Thick enough to be a secure weave, and soooo soft and cuddly. I'll finish this up tomorrow and run it through the wash to see how it works after wet finishing. But I think I may have found the holy grail of triloom yarn finally!!

Saturday, May 28, 2016

May socks, and my studio floof


What with the studio re-flooring after our flood, I just today finished up May's sock-of-the-month offerings. But I got it done! This month, the colorway was 'Surf', from the Deborah Norville Serenity sock yarn collection. It is 50% merino wool, 25% rayon bamboo, and 25% nylon. I like the way this yarn feels and wears, and it slides through my old cranky machine like butter. Except I don't want to wear butter on my feet, and I do want to wear these socks. 

Here's the finished socks, shown on my nice new studio floor. I'm super pleased with both. Now, to figure out what next month's colorway is going to be.
Maybe I'll get my new Studio Floof to help me decide. The stray that moved in a week or so ago seems to be making herself right at home, no? She still wanders in and out (after all, she has a whole neighborhood to run), but as it heats up here in Phoenix she seems to be enjoying the comfort of my computer chair more and more often.

Monday, April 18, 2016

Sock knitting with Patons Kroy Socks FX on an antique sock knitting machine

My daughter & I were in JoAnn's the other day, and spotted some sock knitting yarn that I hadn't tried in my antique  Creelman Brothers sock knitting machine. The beast is about 100 years old at this point, and is quite picky about what yarn it likes to work with.

My go-to yarn for socks has been the Serenity sock weight yarn from the Deborah Norville collection. My machine loves it, and it makes lovely soft socks. But I spotted some Patons Kroy Socks FX yarn, and my daughter fell in love with one of the color combinations. We made a deal: she'd buy the yarn, and I'd use it to test in my machine. If it turned out, she'd get the socks. If not, I'd ball up the yarn, and she'd get the yarn to use in her crochet work.

So, off we went. I first noticed that the Patons yarn was thicker than the Serenity stuff. In the same 50 gram size ball, there were only 166 yards, vs. the 230 in the Serenity. I was going to have to be careful. I make the socks from the cuff down, and I was afraid of running out of yarn  before I finished the toe if I did my usual calf high socks. So I decided to change the pattern to come just above the ankle.


Onto the machine it went. I had to put it on and rip it out a couple of times while I tinkered with the settings on the machine. As it was a thicker yarn, I had to loosen up the tension, and add more weight down below. Even so, the yarn jumped off the needles a couple of times when I was just starting to turn the heels and toes. Luckily, I've gotten good at repairing a run, when I catch it early enough.

I followed my pattern for size 10 women's socks, that I had worked out for the Serenity yarn. It turns out, when your yarn is bigger, and when you have a looser tension, the same number of rows in the foot makes for a longer foot. When I was done sewing the toe closed, the sock measured 10 1/2" long in the foot. That is a half inch longer than what I was aiming for. Also? The yarn, which is a wool/nylon mix, was not as nice to the touch as the wool/bamboo/nylon mix I was used to. Hmmmm....

Well, I decided to throw the finished socks into the wash, and see what the water would do to them. I washed them in warm water with a load of regular clothes, and then tossed them in the dryer on medium heat. And hoped for the best.


It totally worked! The socks shrunk and fluffed a bit in the wet finishing process, and ended up just at 10" long in the foot. And, the fluffing made them softer to the touch. My daughter squealed when she saw them, and tried them right on. She oooh and ahhed about how soft and comfortable they were. And we both absolutely love the gorgeous color changes.

The color repeat is long enough that I couldn't do my usual trick of starting each sock in the same spot in the repeat in order to get matching socks. So, when I make socks with this brand of yarn, the socks will be similar, but the color repeats will be in different spots. Michelle didn't care a bit! I think she likes them better that way.


Overall? Two thumbs up. The yarn is a bit trickier to work with on the machine, but those colors are well worth the hassle. If you were using traditional knitting needles, the extra bit of thickness wouldn't be so much of an issue. And, from here on out I'll wash them in cold on a delicate cycle, and lay them flat to dry. That should avoid any more shrinkage.

Now, I need to make myself a pair!!


Monday, April 30, 2012

CSM socks and hat from Serenity yarn


I made a pair of socks today on my antique Creelman Brothers sock knitting machine. This pair is already spoken for. Don't you love the way the color pools and oozes around the sock? This is made from Serenity sock weight yarn from the Deborah Norville collection, from JoAnne's. It is the 'Aquamarine' colorway, and is a very lovely and soft mix of superwash Merino wool, bamboo, and nylon. I hope the recipient has fun with them!

The cool part of today is down in the lower right hand corner of the above picture. I figured out how to use the leftover sock yarn to make baby caps, also on the sock knitting machine. I like the yarns I've been working with so much that I've kept all the bits leftover after making socks. But I haven't really figured out what to do with them yet. I had tentative visions of weaving projects...but baby caps are just about the right size to use up the leftovers. And the yarn is warm, and soft against the skin. I'm thinking that quite a few newborn baby caps may be in my future! If I get going, I'll make some for friends/family, some for the Etsy shop, and maybe some for the local hospitals come winter time.

Tuesday, December 13, 2011

Triloom weaving with Loops & Threads "Cozy Wool" yarn

I've been searching for just the perfect yarn to weave shawls with on my triangle loom, and I think I finally found it. My pegs are spaced just a little further apart than on most triangle looms, and I've been dealing with the fact that most yarns are a little too thin to give a good, solid fabric when they are that far apart. But this week I tried 'Cozy Wool', by Loops & Threads. (I bought it at Michaels.) It is a 50% wool, 50% acrylic blend, and is not only very toasty warm from the wool, the acrylic makes it really soft against bare skin. My only real complaint is that it comes in a limited range of colors so far.

This is what the shawl looked like on the loom. I used purple, dark blue, and light blue to give a nice plaid effect.


While it was on the loom, I was afraid that this yarn was going to be too skinny for what I had in mind, too. You can see the gaps between threads. (I did go back and wiggle the threads around to even up the weave.)


When I took the shawl off the loom though, the yarn immediately blossomed some as I released the tension.


And then I wet finished the shawl in the washing machine, with hot water in the delicate cycle. After the shawl dried, the fabric looked like this:


The fabric has transformed into a very stable weave that is thick and luxurious, and soft to the touch. Yes!! I finally found my yarn. I'll be making more shawls from this brand for sure.

The finished shawl looks like this:


Thursday, July 8, 2010

Triloom weaving with Sensations "Sumptuous" yarn


A friend of mine put in a request for one of my triangle loom shawls. She wanted a warm blanket weight, in earthy greens and white, in a yarn that had no wool in it. I hunted around for a bit, and came upon Joann's store brand, Sensations 'Sumptuous' yarn. The pegs on my loom are set rather far apart, so I was going for the bulkiest yarn I could get my hands on. This yarn bills itself as 'Super soft and bulky acrylic yarn', and they had the colors I wanted. They were on sale too! However, the store was sold out. The nice ladies kindly put in a special order for me. I asked for two skeins of green, one of variegated green, and bought the skein of white that they had on hand.

A few weeks later, my yarn came in. I trotted over to the store to pick it up...and noticed that the variegated green skein looked kind of puny. Sure enough, though the price was same, the yardage for variegated was less than for solid colors. I grumbled, and got another skein to be sure I had enough. Then I went home and started weaving.

The yarn was in fact soft to the touch, quite bulky, and kind of spongy. Lovely! But I soon found that it was really just bit too thick for easy weaving on my loom. And the bouncy spongy texture made it a bear to try to beat into place. It took some extra care and fiddling, but I eventually got the body of the shawl done. (I'm glad this wasn't my first attempt at weaving on a triloom, though! I might have given up on a fun hobby if this was my first impression.)

When I went to measure out the yarn for the fringe, I realized that I didn't have enough yarn left over from the weaving process. I looked...and sure enough, though the skeins look bigger than the skeins of yarn I usually use (Lion brand Homespun, or Wool-Ease), there is less yardage on each skein. I had to go back to Joann's and pick up another skein of white, and another of green. Luckily, they had them in stock this time. Tip to the wise: know how much you need before you start! Don't assume a skein is a skein is a skein.

Once I had enough materials, the fringing process went pretty easily. I usually double the fringe when I'm using Homespun yarn, but this yarn is thick enough that that wasn't necessary. The shawl is now off the loom, and waiting to go into the wash for wet finishing. And it is, in fact, a blanket weight fabric that is soft to the touch. This will definitely keep her shoulders warm on cool autumn nights!

However, I don't think I'll use this yarn on my loom again soon. The bulk and texture make for difficult weaving, and the relatively small yardage on each skein means I had to spend more in materials than I had intended.

I could see that this yarn would knit or crochet quickly into nice chunky scarves or lap robes, though, and they would feel great against the skin. If I take up those crafts, I'll revisit this yarn.

Thursday, January 21, 2010

More yarn

I took a break from the socks today in order to finish up some of the roving I've been spinning. This is some of the stuff that I got from the Sheep Shed Studio. It is a black and dark brown wool, with smattering of white mohair to give a halo effect. I spun it up into a soft and fluffy knitting yarn. Total available: 4 skeins, totaling 295 yards. It will go up into the Etsy shop as soon as I can get some good pictures taken.

Monday, January 11, 2010

First batch of spinning from the new roving

If you recall, the other day I got a shipment in the mail of mill end roving from the Sheep Shed Studio. This is lovely, high quality wool from the Brown Sheep company, that they couldn't use for some reason. I broke into the cream and brown roving, and quickly discovered why this particular batch wasn't up to being able to be used in the mill.


The roving was full of slubs of fibers, that weren't incorporated into the rest of the roving. If you tried to spin them, the yarn ended up lumpy bumpy, with weak spots. However, the slubs were really easy to strip out by hand, leaving me with quite a bit of usable spinning fiber. I'm sure it was not time and cost effective to do this in a factory setting, but a hand spinner had the advantage here.I'm also left with a bag full of slubs, which I'm planning on using in felting. They're just about the right size for the juggling balls and camera cases I make.


Once the slubs were stripped out, the fiber spun up beautifully!


After filling the bobbins with singles, I plied them together into a two ply knitting yarn. Then I reeled it off onto my weasel (antique clock reel) to measure how much yarn I ended up with. Each time around the arms of the weasel is 2 1/2 yards. I spun three skeins of yarn, for a total of 215 yards.


Look how straight the skein of yarn is hanging! That means I got the plies balanced perfectly in the finished yarn. This should knit up nicely with no biasing.


A before and after shot. The finished yarn almost always looks darker than the roving.


To wet finish my yarn, I let it soak in hot water for a little while. This allows the fibers to move into their finished position. Then I gently squeezed out the yarn...and smacked each skein a couple of times on the floor. This helps the fibers lock together and bloom.


My high tech drying station. The skeins had better stop dripping water before I need to take a shower tonight!

Once the yarn is dry, I'll take pictures of the finished product. The yarn is soft to the touch, and would make a lovely warm winter scarf. Or, with that cream heathered base, I bet it would dye up beautifully. Hmmm... Well, I'll pop it into the Etsy shop until I decide what to do with it.