Showing posts with label inkle. Show all posts

Monday, June 6, 2011

Two useful links, and pictures from around Arizona

First, I wanted to share a couple of cool links I found. The first one is to a pattern generator for inkle weaving. I'll be using this next time I plan a band!

http://www.carolingianrealm.info/PatternGenerator.php

The second link is to a site to help with practicing your figure drawing when you don't have access to a model. I'm usually the one up on the stand modeling, so it is nice to have this gadget so I can get behind the easel for awhile.

http://www.pixelovely.com/gesture/figuredrawing.php

And now, pictures! It was our 22nd wedding anniversary this weekend, so Eric & I took off just the two of us for some time to reconnect. We spent part of our time wandering around the area between Phoenix and Flagstaff, Arizona. Of course, I had to take pictures. Here's a sampling. It doesn't look like the stereotypical desert Arizona scene, does it? Not a cactus in sight.

Wildflowers by Lake Mary:


Ashurst Lake:


Oak Creek Canyon:


Oak Creek:


Thursday, May 26, 2011

Inkle bands, silk painting, and hospital visits

It has been a bit of a crazy time here the past week. My husband ended up back in the hospital for a spell, to zap some various infections. So my focus has been a little scattered. However, I did manage to finish up the band I had on the inkle loom. If you recall, this was woven of leftover hand dyed sock yarn. I lined up the color repeats on the loom, so the band shifted from one color to the next with a nice feathering. The result is quite a bit different from the usual rigid patterns that you get with inkle weaving. I've got another band on the loom right now, but I wasn't really paying attention with that one and the width of the band varies. (I did much of it with me in the hospital.) I really need to practice even tension more, so I can get even selvedges without thinking about it. Anyway, here's how the first one turned out.


I've also managed to get 2 dozen silk scarves dyed over the past two weeks.


The last one is currently drying on the frame. I need to let them sit and cure at least 24 hours, so hopefully I can get to steam setting them on Friday. Then I'll let them sit and cure again over the weekend. I'll probably get to washing and ironing them on Monday. That means I can take pictures and list them for the Etsy shop (tangibledaydreams.etsy.com) over the course of next week.

Assuming nobody else ends up in the hospital.

Ahem. And nobody will end up in the hospital. Right? Right. Glad we cleared that up.

Tuesday, May 17, 2011

Sock yarn on the inkle loom, and silk painting ties


I got in my next order of silk scarf blanks from Dharma Trading company the other day. Today I got around to pre-washing them. I now have two dozen bits of possibility hanging in my studio window, just waiting for me to pull out the colors. It is going to be a fun several weeks getting those painted up! I ordered some earth toned dyes this time, to expand the look of the scarves. We'll see how those work up.

I also picked up a couple of silk tie blanks. They can't be used with the Tinfix dyes I use for the scarves, since the ties are dry clean only and can't be steamed. But I had some older Dye-na-flow dyes that are heat set, so I decided to give those a try. It worked fairly well, but the Dye-na-flow didn't react very well to the watercolor technique of using coarse salt on the drying silk. I get some speckling, but not the cool organic shapes that I get on the scarves.


The Dye-na-flow needs to be ironed for about 3 minutes to heat set the dyes. That is 3 minutes per section. It took me about a half hour to completely iron the tie front and back.


However, the results look kind of cool. I think this needs some more experimentation. Dharma has another brand of heat set silk paints called Setasilk. Those paints reportedly respond well to the salt technique. I think next time I make an order I'll get a batch of those, and another handful of ties to play with.


What do you think? My guys all said they would wear something like this. They would need to be priced between $35 and $40 to cover everything involved. Also, what size ties do you or your menfolk wear? 2"? 3"? 4"?

On another note, I got the sock yarn band off of my inkle loom. This is woven of Regia Galaxy sock yarn. I still need some work on the evenness of my selvedge edges, but that will come with more practice. I tossed it in the wash and then the dryer, and ironed it smooth afterward. I lost about a foot of length in the washing process. Overall, I'm happy with the way this turned out. I like the variegated effect.

However, I was curious...what would happen if I lined up the repeats for the color variegation? I found that with commercial sock yarns the repeats were really too long for my little inkle loom. I'll have to try that trick on my bigger floor loom later on. However, I did have some sock yarn that I hand dyed awhile ago. In fact, it was left over from this project: http://tangibledaydreams.blogspot.com/2009/11/tutorial-dyeing-sock-yarn.html . The repeats were almost short enough to line up on the loom. I knotted the extra, and I was set to go.
Doesn't that look lovely?
I started weaving and, sure enough, the gradual variegation is coming through nicely in the weaving process. This particular sock yarn is a little stretchier than the Regia, but I'm able to compensate for that by holding on to the warp by the heddles while I tamp things down into place with the shuttle. I'm looking forward to seeing how this one turns out. I think it will be lovely.

Wednesday, May 11, 2011

Socks on my Creelman Brothers machine, and sock yarn on the inkle loom

I recently put in an order to Dharma Trading Company for some more silk scarf blanks, and some earth tone dyes. This time I also ordered two blank silk ties, to try painting them as well. I had such fun with the last set of scarves that I really want to keep going with them.

While I'm waiting for the order to come in though, I dusted off my Creelman Brothers circular sock knitting machine. I had a friend order a set of socks for her husband's birthday present. I snapped a picture of them in progress, about the time that I was ready to turn the heel. (That is why half of the needles are lifted up out of play.)


I'm happy with the way that they turned out. These are men's size 10 socks, out of Serenity sock weight yarn. It is 50% superwash merino wool, 25% bamboo, and 25% nylon, which makes for a snuggly soft but still strong sock. And they are machine washable, too.


I was pleased enough with how those turned out that I figured I'd make another pair out of the same yarn this evening. I wound up a different colorway, and got started.

The first sock turned out beautifully. The second one was perfect...up until I wasn't paying attention on the Last Two Rows. I screwed up, fixed the mistake, and then screwed up even bigger. So I ripped the whole sock back out into ball form, and set it aside until my head clears. I'll make that second sock tomorrow. Sometimes you just have to step AWAY from the machine.

I did figure out what to do with the partial skeins of yarn that are left over after I make the socks, though. I've been balling the tail ends back up and saving them. I've got a small basket full of small balls of sock yarns now. In fact, the basket is overflowing and ending up on the floor. So I got an idea, and put a batch of sock yarn on my inkle loom to see how it would work up. I usually use cotton crochet thread for my inkle bands, so this was a new experiment for me.


The yarn is a little grabby, so I need to be careful to get the sheds open well. But it is easy to keep tension, and the variegated sock yarn works up into a lovely band.


I think these will make lovely belts, especially for my historical recreation hobby. Maybe camera or guitar straps? Hmm...and I bet I could make stripes of different sock yarns to add to the patterning.

What would you use bands like this for?

Friday, August 20, 2010

Tutorial: Warping a standing inkle loom for card weaving


I got my new-to-me standing inkle loom all warped up for card weaving. This was my first time warping this loom, which is always a bit of a problem solving process. But once I got the bugs worked out, it went very well. For the tablets, I'm using the coasters that I altered the other night. (Go back two entries for that tutorial.)


I went through my stash of weaving yarn, and picked out several cones of 8/2 unmercerized cotton. This was leftover from several towel projects. The blues and greens are not the same color obviously, but when I squinted at them I could see that they were just about the same value. That means they will blend visually, while giving just a bit more interest to the finished product. I needed 4 cones of dark, and 2 cones of light.


I clamped the loom on top of a cone holder that my husband made for me several years back. This made it easier to keep the yarns from tangling up.


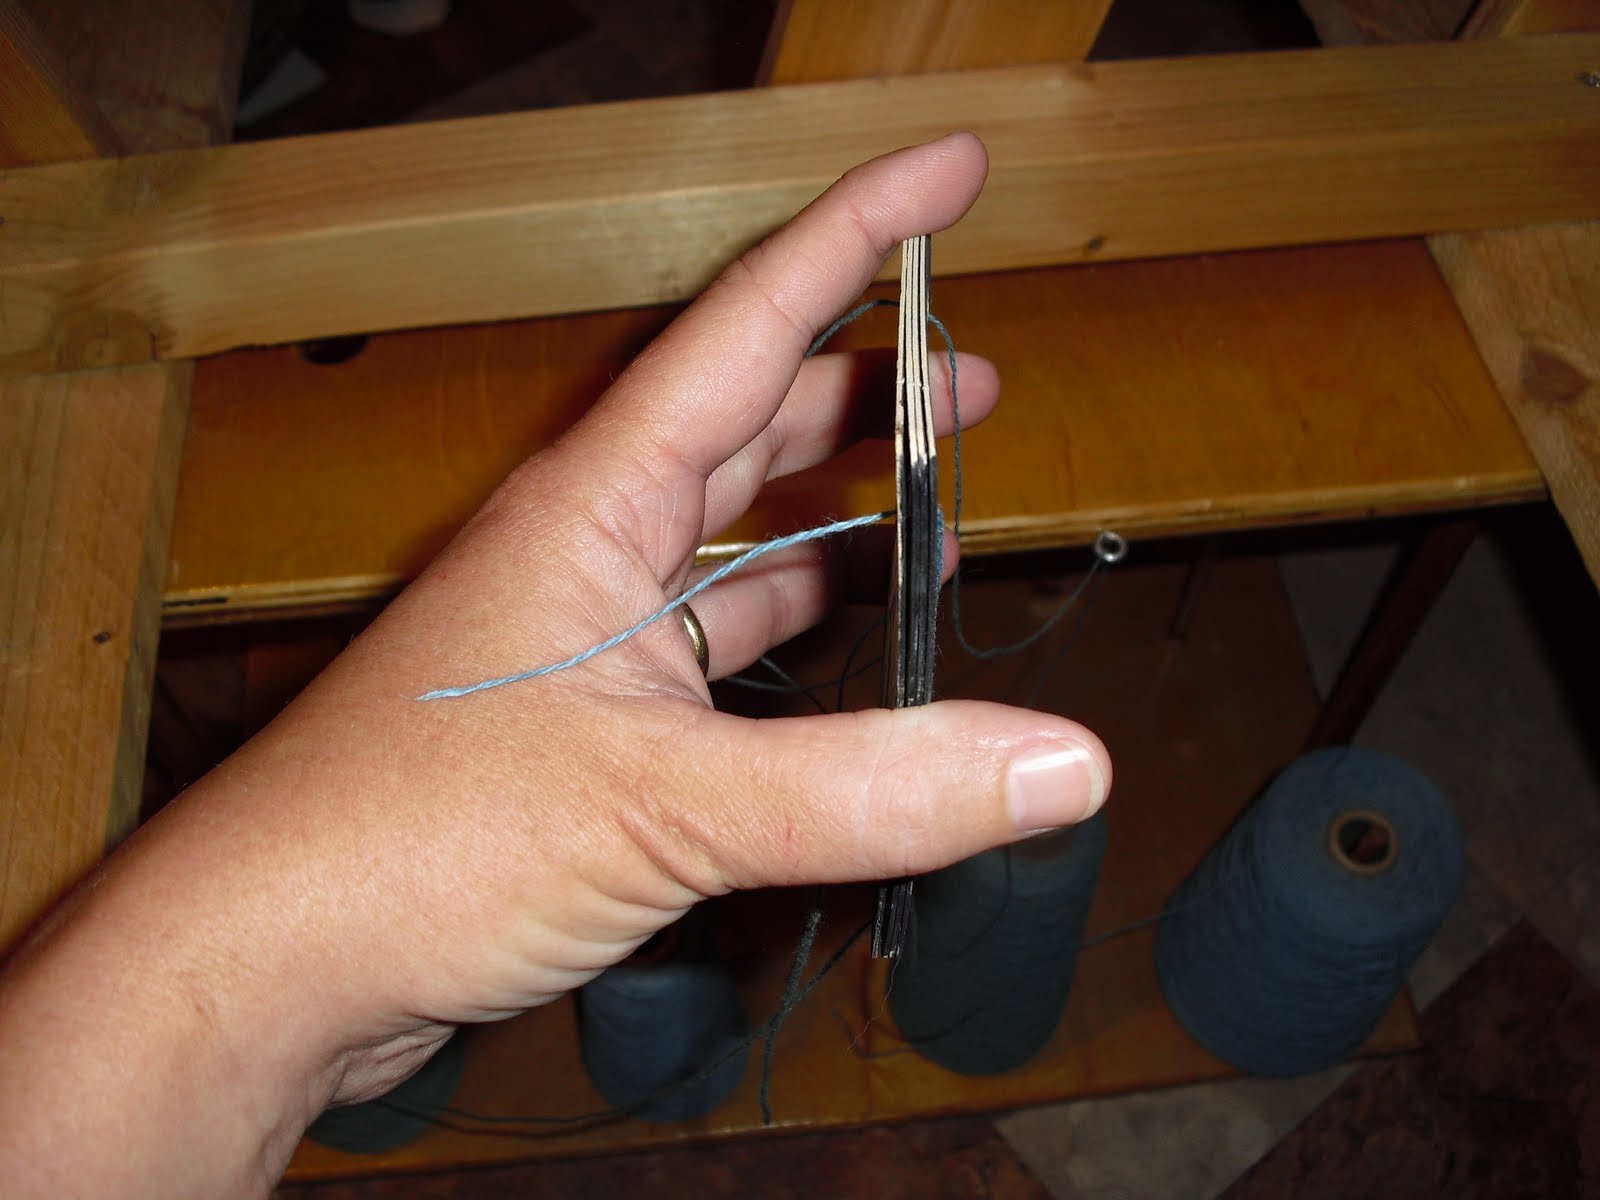
I picked out 4 cards for the border of my strap, and lined them all up the same way. Then I threaded the yarn from each cone through a separate hole, all coming from the same direction.


I tied all 4 threads together, and then tied them on to the first peg on my loom


I dropped off one card from the top of my stack there by the first peg. Then I used a binder clip to clip together my stack of working cards


Then I wound the threads around my pegs, holding the working stack of cards in one hand. I had to use one hand for the camera here, so it isn't quite right. I usually held the cards in my right hand, and guided the threads around their path with my left.


When I got back to the beginning, I wound the threads around the top peg several times to free up both hands. Then I took one card out of the binder clip from the working stack, and added it to the stationary pack. I used a second binder clip to keep the cards in the stationary pack from wandering around. Then I unwound the threads from the peg, and went around the path again.


I kept doing that, until I had gone around the pegs again after dropping the last card off. Then I cut the threads down by the cones. I went back to where I had originally tied on to the first peg, and carefully cut that knot. Those two ends got tied together, so there was a continuous warp.


Now, I threaded a stack of 16 cards for the middle pattern part of the strap. The A and B holes got dark colored threads. The C and D holes got light colored threads.


It was a little harder just to poke the thread through the whole stack of cards, so I used a tapestry needle to help me out. The pattern cards were warped the same way as already shown. Then I did a second stack of 16 cards, again in the pattern colors. (The binder clips are only so big, so I didn't do the whole stack of 32 at once.) After that, I did another 4 cards of all dark colors, for the other border. The pattern is 4 cards all dark, 32 cards dark and light, 4 cards all dark.


After the loom was all warped up, I started weaving the header. The cards separate the threads, creating an opening (or 'shed) for the weaving process. Rotating the cards brings different threads to the top, creating a different shed.


With all the cards lined up identically, I made a great stripe pattern.


However, what I wanted was a wavy water pattern. I rotated each pattern card separately, until the light and dark threads matched the pattern seen here. This is from Candace Crockett's book "Card Weaving'. (I highly recommend this book for beginners!)


After I had the cards in order, I started weaving...and found that I had the pattern on the bottom of the band instead of on the top. I reversed the notching pattern. This gave me smooth diagonal lines. By rotating the pack forward 4 times, and then reversing to rotate backward 4 times, I got my wavy line pattern.

I'm all set ready to weave. Warping and weaving the header took me a bit over an hour and a half.

Sunday, June 27, 2010

Wet felted purse, and an inkle woven band


I took some time today and finished up the red and black felt containers that my son and I made the other day. Well, yesterday he sewed the button and loop on his own, stuck his camera in it, and put it in his pocket. I think it has been there since, except when he is proudly showing it off. But I did the other two today.

The middle sized one is a great size for a blackberry. I sewed a fingerloop braid on it, and it will be going to its new owner tomorrow.

The big one, pictured above, took some thinking. I decided that it would make a good size for a casual little purse. The interior is 3" x 1" x 4 3/4", which is just the right size for some keys, money, ID, and a few other necessities. But I had to figure out what I wanted to do for a strap. I like my purses to hang over the shoulder and reach about to my waist. I haven't figure out how to do a finger loop braid quite that long. (I'll do a tutorial on finger loop braiding in a while, when I can get someone else to take pictures of my hands.)

My first thought was to weave an inkle band for the strap. So I grabbed some red and black cotton thread, made up a pattern, and warped up my loom. I'm liking how the band is turning out!


But...it is taking several hours to create the band. Longer than the body of the purse took, actually. If I were making this for myself, I might continue on. But I'd like to put this in the Etsy shop, and I'm thinking that nobody is going to want to more than double the price of the purse in order to have a hand woven strap. (If I'm wrong, I'd happily take custom orders!) So instead, I spun up some two ply yarn out of the same roving that I did the felting with, and then cabled three strands of it together. That did the trick. I hand sewed the cord onto the purse. It hangs 16" down from knot to purse, which puts it at just the right length for me.

I'll still finish up the inkle band, but I'll end up either using it for a different project (trim on a historical costume?), or I might list it in the Etsy shop on its own. I'll see how it turns out.

Friday, February 26, 2010

Medieval Box Loom

http://cartelfr.louvre.fr/cartelfr/visite?srv=car_not_frame&idNotice=3414


The above link will take you to the Louvre's site, and a picture of a tapestry from the 1500's that shows a lady weaving on a loom very similar to the one I picked up earlier this month. Today, I finally had an evening free enough to warp it up and give it a try...


I measured out 4 yards on my horizontal warping mill. As I came to each color change in the pattern, I simply cut the old color, and tied the new one on to the old thread.


I tied several choke ties to keep everything in place, then chained the warp off the mill.


I had ordered this Beka rigid heddle from Paradise Fibers. However, my usual sley hook didn't fit through the holes. I fixed that by making a mini sley hook out of wire. I put a coil at one end so I would have something to hold on to, and a little hook at the other. Then I pounded it with a hammer to harden the wire, and make it stiff enough to use. Worked like a charm!


Next, I sleyed the reed. I used a couple of binder clips to hold it upright while the job got done. Yay for improvisation!


I tied one end of the warp onto the back apron rod, then used the reed to space out the warp evenly. I wound on with my left hand, using my right to keep tension on the threads. I wound strips of paper onto the back beam along with the warp, to keep the threads from sinking down into each other. That helps with maintaining an even tension.


Then I tied the warp onto the front apron rod...


...and wove a header. I experimented with 4 or 5 different weft threads before I decided on a nice green.


Here's a shot of the band in process. The side threads are actually greener than shows up on my monitor, and the yellow stripes down the middle are brighter. I call this pattern, "Road Trip", as it was inspired by looking out at the road stretching before me on long distance meanderings.


And here is a picture of the loom, all up and running. Isn't it cute? It will be a great take-along project!


EDIT: I got the loom from http://dragonslairmerchants.com/ for $75.

Sunday, November 29, 2009

Inkle Pattern: Christmas book marks

I was headed out to SCA practice today, and realized I didn't have a good project to take along with me. So I grabbed the inkle loom and some cotton crochet thread, and spent the afternoon chatting and warping up the loom. I decided that some simple bookmarks in Christmas colors might be fun for the day.


Handsome, aren't they? I encourage you to make your own! Here's the warping pattern I used:

G G G W W G G G W W R R R R R R R R R W W G G G W W G G G
G G G W W G G G W W W W W R R W W W W W G G G W W G G G

G: green
W: white
R: red

Read from left to right, starting with the top 'G' and alternating between the top and the bottom rows. The top line are the yarns that are threaded above the first post, and the bottom line are the yarns that are threaded below the first post. Make each bookmark about 7" long. Cut a couple of lengths of cardboard to weave in between bookmarks, like you see in the picture. That leaves room for fringe on each end.

Have fun with them. These would make great stocking stuffers, or little gifts for co-workers.