Showing posts with label dyeing. Show all posts

Thursday, April 12, 2018

Hand painting a ruana: Don't get cocky!

My latest project on the loom is a warp painted ruana. It is going to be gorgeous! But it has been a struggle, mostly because I got cocky and missed little details.

So, it started well. I sat down with my client, and we batted around ideas and picked colors. I usually do my warp painting with about 4-5 colors of dye, but she picked out 10 colors. We figured out how to put them together, and off we went.

When I had the dye and the yarn, the measuring began.
And then, the dyeing. Here was snag number one. I usually dye with foam brushes, but I forgot that I only had enough for 6 colors of dye. And I was working with 10 colors this time. And I started dyeing after stores closed. So, I shrugged and got eye droppers, which I had plenty of. Annnnnd dyeing took a bit over 8 hours, non-stop. Eye droppers are NOT the way to go. Lesson learned. It turned out, but that was quite the marathon.


Also, see the strips of cut up plastic bag that I tied on the ends of the warp chains in that middle picture? I use a permanent marker to write numbers on them, so I can keep track of the order of the warp chains. That helps me get them back onto the loom in the same order that I dyed them in. Lesson two: use Sharpie, not the knock off brand even if it is near to hand. Because the knock off brand washes off in the rinsing process, and then you have a puzzle to solve when you take the chains to the loom!

Lesson number 3: It is quite ok to use your top loading washing machine to soak your warp chains when you are rinsing them, to get the excess dye out. But for the love of God, do NOT turn your back and let it flip over to agitate mode. Luckily, I had put the chains in lingerie bags, so it wasn't a total disaster. But I had some serious untangling to do to separate things back out.


Lesson number 4: Double check which reed you have on the loom before you start sleying it. I got halfway done, and realized I had the wrong one in. I had to take the old reed out and lay it across my lap, then one by one transfer the threads into the new reed. Again, nothing I couldn't recover from, but a pain in the neck! And it would have been an easy catch if I had looked before I started.
Thank goodness for the warping trapeze! It took some patient work to straighten out the tangles from my previous goofs as I beamed the warp on, but I did eventually get everything on the loom under even tension.
From there on out, things have been much easier. I've got enough warp on here for three garments. I'm using black cotton for the first weft choice, purple cotton for the second, and I'm currently weaving black tencel for the third.

So, all's well that ends well? This is turning out beautifully. But boy, have I said a few words along the way!!


Friday, February 9, 2018

Dyeing sock yarn, making flip-flop socks, eclipse pictures, and needle felting.


So, what have I been up to this past month? Playing in the dye pots! I'm really getting a kick out of creating variegated yarn by dyeing it in my crock pot. I love what is coming out of it so far.

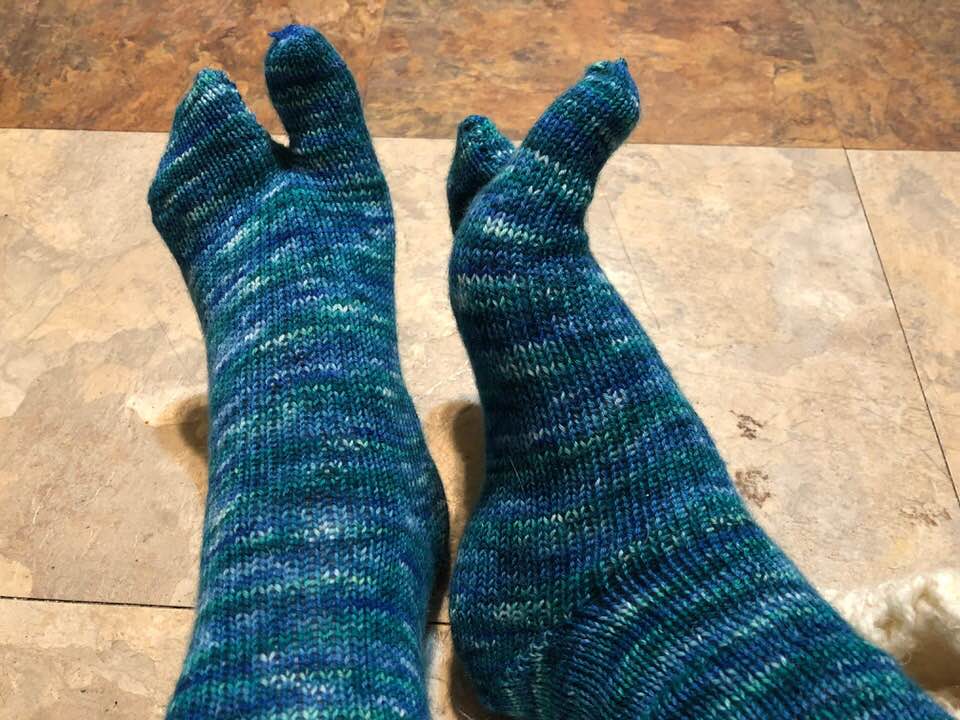
I had a request for flip-flop socks, so I've been teaching myself how to do those on the sock knitting machine. They are a bit fiddly, but I'm getting the hang of it. I'm part of a circular sock knitting group on Facebook, and there were instructions for these in the files. So far, so good.


I had a great time getting these shots of the lunar eclipse. My husband Eric got up early, I stayed up late, and we made a drive out to our favorite spot in the White Tank Mountain regional park west of Phoenix to stalk the super blue blood moon. I'm quite pleased with the results.


And speaking of pleased with the results, I tried my hand at two dimensional needle felting, using some 8x10" wool prefelts for a base to work from. The first picture was me just doodling over the course of an evening, trying out layering different colors in an abstract piece to get a feel for the materials. The second was my attempt at fiber figure drawing, using just black and white wool felted over a medium grey piece of wool prefelt. I am loving the results!! I am definitely going to be pursuing this medium for my art. I dyed many of the colors in the top piece, by putting a length of white roving in with my sock yarn when I dye it. So, this combines my dyeing, my felting, my drawing, and hopefully in the future my photography. I'd like to take pictures, and use them as reference photos for my fiber painting.

I am really really excited by the possibilities here!


Friday, December 8, 2017

Tutorial: Self striping sock yarn

Now, I am not an expert. But I hand dyed some self striping sock yarn, and I'm really pleased with how it turned out!


So, I figured I'd share what I did with you all.

Materials:
Wool yarn. I used superwash sock yarn, which is less likely to felt.
Jacquard acid dyes
vinegar
water
cotton crochet thread for ties
Dawn dish soap for washing afterwards

Tools:
saran wrap
squirt bottles
measuring spoon
gloves
dust mask
warping mill (or something to measure out your yarn)
swift (Or someone to hold the hank of yarn out for you in their hands.)
ball winder (Optional. You can ball up the yarn by hand.)
scissors
steamer
tub for soaking

Note: Do not use any of the items used for dyeing for food preparation ever again.

So, the first thing I did was to wind the hank of yarn from the swift onto my warping mill. I figured that 5 yards on the mill would give me about a 10 yard repeat (as the yarn goes back and forth from end to end.) My calculations were that that length would give me about an inch pattern repeat in my socks. You'll have to swatch for your own tension and row size to get your own figures.
 I tied loose figure 8 ties every yard, from some cotton crochet thread. That helps keep things from tangling, and the cotton doesn't dye so I can find it easily later on. Don't tie these too tight, or they will block the dye from getting through to the yarn.
 I also used loose ties around each arm of the figure 8 crosses at the ends of the warping mill. This again keeps things in order, and makes it easier to replace the yarn back onto the mill when the dyeing process is done.
 Then I chained the yarn up as I took it off the warping mill. No tangles!
 I soaked the chained up yarn in a tub of water and vinegar for half an hour. I had about a cup of vinegar in here. This provides the acid for the acid dyes to bond to the fiber.
 While the yarn was soaking, I put down a layer of cling wrap onto my work surface.
 Then, I chose my colors. My client wanted green, yellow, orange, and pink, as bright as possible.
 At this point, I put on my dust mask and gloves. Then I put about a half tsp of dye into each squirt bottle, and mixed it with warm water. Once the dye powders were closed up and put back away, and my area cleaned up, I could take the dust mask back off. I don't want airborne particles in my lungs!!
 I squeezed the water gently out of my yarn, and laid it out onto my work surface.
 Then, I had fun with the squeeze bottles! I used my gloved fingers to squish the dye down into the yarn, to make sure it got all of the way through. A bit of color theory helped here. I wanted bright colors, and I know that colors across the color wheel from each other combine to make earth tones. So, I kept the green and pink/orange far away from each other.
 After dyeing, I covered everything with another layer of saran wrap.
 Then, I rolled the bundle up.
 I curled the long bundle around itself, and put it in my steamer. I steamed the packet of yarn for an hour, then let it cool overnight. The next morning, I rinsed the yarn in the sink with first a squirt of dish soap, and then plain water to rinse the soap out. You are looking to rinse until the water runs clear. It didn't take long at all this time. Then, I hung the yarn up to air dry. (I forgot to take pictures of the rinsing and drying process.)
Once the yarn was dry, I put it back onto the warping mill, and used my automatic ball winder to put the yarn into a useable form.
 All ready to go!
It worked!!! I cranked out a pair of socks on my 100 year old sock knitting machine, and just danced in my seat the whole time. I am really, really pleased with how it turned out!

Monday, November 20, 2017

Yarn dyeing, triloom weaving, and studio arranging

Well, I've got sausage and potatoes cooking upstairs, and yarn cooking downstairs. As long as I don't mix them, I should be ok! This is Platinum sock yarn from Wool2Dye4, that I'm dyeing with Jacquard acid dyes in my crock pot. The colors look all sorts of tasty, but I think I should eat this with my eyes, and stick to my potatoes for dinner, no?

So, dinner, watch the sunset...


....and then get back to weaving, I think. I just finished this grey and pink triloom shawl, and have another of the black and jewel tones on the loom now.

I did rearrange my studio a bit between that picture and this next one.

I'm only using one of my floor looms right now, so I folded the dobby loom against the wall and moved my triangle loom over to that corner. That means I can set up the antique sock knitting machine over where it used to be. So, I have 4 work stations currently: the floor loom, the triangle loom, the sock knitting machine, and the work bench where I have the dye station currently up. That ought to keep me busy!!

I want a bigger studio. I always want a bigger studio, no matter how much room I have. But I'm making better use of the space that I have, and that is a good thing.

Thursday, August 31, 2017

Crock pot dyeing sock yarn.

So, time to learn something new to me! I've been making socks with my antique sock knitting machine, and that led me to itching to want to dye my own sock yarn. I went hunting around the internet, and found a couple of inspirations. This blog entry (https://yarndesignersblog.wordpress.com/2013/04/19/no-mess-crock-pot-yarn-dyeing/) and this video on YouTube (https://www.youtube.com/watch?v=Hv25WIVdOik) both used a similar technique of sprinkling dry dye powder on hanks of yarn in the crock pot. That looked like a great way to get my feet wet (so to speak). I decided to go with Jacquard acid dyes for their light fastness and color selection, and made myself an order from Dharma Trading Company.


I went ahead and got a rainbow of colors, plus brown, black and gray. And, I decided to go with the citric acid crystals rather than just using vinegar, so my project wouldn't smell up my house. Then, I had to figure what yarn to use. My antique knitting machine really works well with the Serenity sock yarn from JoAnns, so I picked up some white skeins to start with. I have an antique clock reel that I rescued from a second hand store (it had been turned into a plastic flower planter, poor thing!), and used that to turn two skeins of yarn into one hank of yarn. Each skein is enough for one sock, and this way I could get matching socks from a dyed hank. Though, come to think of it, it might be fun to dye related but slightly different hanks, for the non-matching fraternal sock craze that is going on. Hmmm.....
Then, more or less following the directions on the two sites, I got to playing in the color. I have three hanks of yarn in the crock pot tonight. The bottom skein started white, and used the figure 8 way of putting the yarn in the crock pot. (Twist the big loop once, so it looks like an 8, and then fold the two loops over onto themselves. Put that in the crock pot.) The second hank is also done in the figure 8 way of laying out the yarn, but it started purple. I wanted to see what it looked like to overdye another color. The top hank is just scrunched in one big circle, and started white. I've used purple, fire red, and brilliant blue dye colors, in approximately equal proportions around the ring.
So...now it simmers over night. I put on high for the first hour, and then popped it down to low until I wake up tomorrow. I'm finding the biggest challenge so far is Not Messing With It. I want to poke at it, and that will just disturb the water and muddy the colors. But....I want to play!!!

Hands off.

Go to sleep.

Dream of color.

Sunday, November 27, 2016

Textiles class final project: Make a Map


I've been taking a Textiles class at the local community college this semester. We've done felting, embroidery, ice dyeing, shibori, surface embellishment, and coiling as the sections. For our final project, the assignment is to make a map of some sort, using some of the techniques we've learned over the semester.

I was stumped. I thought for awhile that I'd make a fabric map of Snake Bay on Lake of the Woods, where I go for summer vacations. But, what I envisioned for that was going to take a lot of embroidery. And, I still really don't care for embroidery. Other techniques grab me much more. So, while I was working on my coiling project (bowl made of hand dyed wool yarn wrapped around clothes line)...
...I decided I wanted to do something more three dimensional. And, maybe not hold myself to an actual place. Wouldn't it be fun to make something like a pirate's treasure map? And my brain was off and running.

So....take a gourd. Maybe ice dye it to make island ground colors? Felt around it in water colors. Cut it open. Coil around the top, to mark the entrance to the treasure cave. And then embroider on it to make the map leading to the island. I don't think that makes sense to anyone who is not in my head, but I can almost see this one. And I am kind of excited to give it a try.

Step one was a visit to Wuertz Gourd Farm, which you can see in the picture at the top of this post. http://www.wuertzfarm.com/ Seriously, if you can't find the gourd you're looking for there, you aren't trying. I have never seen so many gourds in one place! All sorted by type and size. So, I picked out two kettle gourds. One to work on, and one as a spare in case I screw up the first try.
I could have paid extra for a gourd that already had the waxy coating cleaned off of it, but it is easy enough to do with some water, a copper scrubbie, and some elbow grease. You can see the difference that taking that coat off makes visually!
Then I did some mad scientist art experimentation, and tried to ice dye the gourd. I couldn't find anything on line about it, just that it was possible to use Procion powder dyes to dye gourds. I wrapped the gourd in towels soaked in soda ash water to prep it, then removed the towels, buried the gourd in ice, and sprinkled the dyes on the top. 24 hours later, I rinsed off the gourd.
Hrm. I'd guess that I didn't find much on ice dyeing gourds because it doesn't work terribly well. Especially for the amount of pigment that went into the attempt. I'll keep ice dying for fabric, like in this class sample done with the same general technique:

But, the dyes did leave some subtle reds and greens, and brought out the natural variations in the gourd. I can definitely work with that for this project. I just won't try it again. (Unless someone out there has ice dyed gourds more successfully? I'd love to hear your technique!!)

Tomorrow in class, I'll attempt to felt over the gourd. I've tried this once before, and found that the felting process makes the gourd shell very delicate and apt to tear when it gets soaked. But I had already opened and cleaned that gourd, so the water was getting in to the shell and soaking from both sides. I'm hoping to avoid that this time by waiting to carve the gourd open until after the felting process, and after everything has dried back out. I've cracked several gourds in the cleaning process, so this is a risk also. Luckily, I have that spare gourd for when I screw this one up.

Wish me luck!


Saturday, November 19, 2016

Hand dyed sock yarn, and a shot of me with my sweeties

I had a request for a couple of pairs of socks, cranked out on my antique sock knitting machine. The blues that she wanted were easy to find in commercial sock yarn. However, she also wanted some rich earth tones with touches of brown and green. And wow, the easily available varieties of sock yarn have diminished since I started making socks. However, I did have a skein of white wool/nylon that I had been meaning to experiment with. And I had some Procion dyes. Now, those are really meant for cellulose fibers rather than protein fibers, but if you swap out the soda ash in the soak for vinegar, it works pretty well. I liked the colors that I got.

The remaining question was, was this yarn going to work in my finicky machine? It doesn't like yarn that is too thick, and commercial sock yarn is kind of a hit or miss as to whether or not it will flow through the machine. Luckily? This works!


I still need to run the resulting pair of socks through the washing machine to wet finish them, but if that turns out well I will definitely be ordering more of this yarn. And, experimenting with a few different methods of dyeing sock yarn. I'm seeing a new obsession....er, product line....in my future!

Oh...and since I know some of you were curious after my post of a couple days ago, here is a shot of me with my two sweeties.


Both of my kids and my son-in-law were in town last month, so we got our family portrait done. While we were there anyway, I grabbed a shot of the three of us just for fun. The photographer was a little puzzled, but she rolled with it very nicely.

And now, I really ought to put the yarn away and get some sleep. It is 3:30 in the morning. But I am wide awake, and I want to play in the color some more!!