So, my last post left us here in the process of making my 3d Pirate's Map for my final project for my Textiles class this semester. I had picked up a gourd, scrubbed the waxy coating off, and iced dyed it for a subtle coloration. So far so good. Next up, I needed to felt around the gourd. Last time I tried this, I carved the gourd open first and then felted around it. But, the gourd got really waterlogged that way, and that makes for a fragile gourd. This time, I decided to do the felting first, to take advantage of the natural water resistant rind. The risk, of course, was that I would crack the gourd in the cleaning process, and waste all my work. But, that is why I bought a spare gourd!
So, I went through my stash of wool roving, and pulled out my blues and greens. I want the felt to represent water, with the top of the gourd sticking up like an island. Ready? Go!
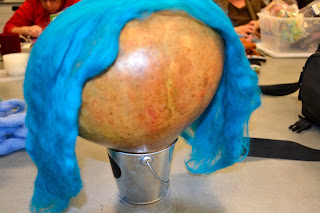
I found a little pail, and turned the gourd upside down. Then I spread out a length of roving and laid it over the gourd. It kind of looks like hair here. I resisted the urge to draw googly eyes on it.
Instead, I kept on adding thin layers of wool roving at right angles to each other, until I had 4 layers built up. Then it was time to add wisps of the colored roving to make it look watery.
I needed to hold the wool down to the gourd so I could get the felting started. So, I cut the legs off of a pair of panty hose, and tied the remaining stubs in a knot. That left me the body part of the hose, which was just the right size to come down and around the woolly gourd. Time to soak it with hot soapy water, and get to rubbing! The fibers will velcro themselves together.
Once the fibers were holding together, I could take off the pantyhose and just work it with my hands. At this point, I cut slits in the wool. With luck, these will pull apart as the wool shrinks down into felt, creating the look of little islands around the main island.
So far so good! The gourd stood up to the hot soapy water. The slits pulled apart into openings. And the wool shrunk and velcroed itself into a nice firm felt, that is holding to the gourd without the need for glue or stitching. Time to let this dry thoroughly before I cut the top off, and clean out the insides. Crossing my fingers that I don't crack the gourd in the process.
Yay! No cracks. I cut the top off, cleaned out the insides, and sanded down the rim. Then, I drilled holes and strung the opening with a web of artificial sinew, so I could needle weave my 'X marks the spot' and compass rose.
I also took a bit of time, and hand spun some wool yarn for the coiling at the rim. I used some of the same turquoise and green roving that I used in the felt, to tie the colors together. But I also added some browns, so the coiling could represent foliage.
My needle weaving is done, and I've started coiling. Round and round I go.
I like it! The red X marks the treasure spot in the cavern, and the blue arm with the white arrow points north. I had a pendant hanging around that makes a great sample treasure coin.
Now, to add some sea foam to mark the shore of my main island. I'm making a branched fringe with glass beads, crystal tear drops, and freshwater pearls. And a cloissone fish, just because.
Done!! I added some seashells to the sea foam shoreline. And then, it was time to make my pathway that makes this actually a pirate's map. You start at the coin with the key, and follow the freshwater pearl pathway from little island to little island, collecting keys. Avoid the little islands with the skull and crossbones. Trust me on that one. When you get to shore, follow the woodburnt dotted line up the beach to the foliage, and then the garnet path will lead you up and around into the cavern. The treasure is almost yours!!
This was a fun project. The assignment was pretty open ended. Just, make a map using some of the techniques that we learned over the course of the semester. I'll turn this in tomorrow, and see what the teacher thinks!


No comments:
Post a Comment